header image

Blog

Removing Diesel/Gas Stains and Odors

Have you ever been pumping gas and all of a sudden the tank is full and Ooops! the gas splashes out and right on to your clothes? So how do you get that awful odor out? It’s important to know that diesel/gas stains make all fabrics more flammable than normal so it is very important to handle the items carefully.

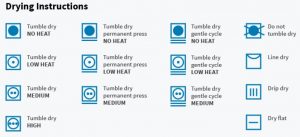
IMPORTANT NOTE: Gas and diesel stained clothes and rags should not be washed with other clothing. If after washing you can still smell fuel odor, do not place the garments in a clothes dryer. The excessive heat can cause the fabric to burst into flames.

Since gasoline and diesel are petroleum oil-based stains, they need to be pretreated using a solvent based stain removal product, like Shout or Spray ‘n Wash. If you don’t have a solvent-based pre-treater, apply a bit of enzyme-based heavy-duty liquid detergent, like Tide or Persil to the stain and work it in by gently rubbing with a soft bristle brush. Allow the stain remover to work for at least fifteen minutes before washing.

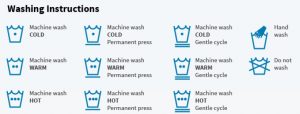
After pretreatment, wash the garment as usual in the hottest water appropriate for the fabric. Inspect the garment for stains and sniff for odors before drying and repeat treatment if necessary.

If there is still any lingering fuel odors, soak the stained clothes overnight in enough water to completely submerge the fabric with 1 cup baking soda added. Then rewash and rinse as usual.

For exceptionally heavy odors, fill the washer, deep sink or plastic tub with warm water and add 1 cup household ammonia. Shut the lid or cover the solution if possible. Allow the garments to soak for several hours or overnight. Drain the washer and wash as usual.

DO NOT USE ANY CHLORINE BLEACH during the soaking or washing because dangerous fumes can form.

Allowing the clothes to air dry outside will help remove odors as well. Again, if any trace of odor remains, air dry on an indoor rack or outside on a clothesline. Do not put these items in an electric or gas dryer.

Read More 6 Ways to Cut Down Energy Costs In The Summer

How to Get Cleaner, Brighter, Clothes


Why buy expensive or dangerous cleaning products, bleaches or de-greasers when all you need is probably already in your cabinet!

Did you know baking soda can work magic — including getting cleaner and brighter  whites at a fraction of the cost.

It’s as easy as 1, 2, 3…..

1) Put one cup of baking soda in your wash.

2) Then add your detergent

3) Run your wash on the normal setting and……Voila!  Brighter, cleaner whites!

Try this DIY homemade laundry detergent recipe. This is a project that will save you money and help you rid your home of toxic chemical cleaners and make your clothes brighter and cleaner in the process.

Ingredients

  • 1 bar (or 4.5 ounces) shaved bar soap (a homemade laundry bar, Ivory, or Zote)
  • 1 cup Borax
  • 1 cup baking soda

Directions

Thoroughly mix all ingredients together. Use 1 Tbsp per small load (or 2-3 Tbsp for large or heavily soiled loads) then add  to your laundry.  Store remaining in a sealed container.

Keeping your colors brighter is a challenge at times. Colors fade when the chemical bonds between the dye and the fabric break down, so the best way to keep your colors bright is to wash clothes in a way that either prevents dyes from dissolving, protects the fibers in the fabric — or both. Follow these tips, and your colors will look as good as new!

  • Turn clothes inside out— According to experts, the tumbling action of the wash cycle and the dryer can cause fabric fibers to break as clothes collide into each other and against the walls of the machine. Turning clothes inside out before you wash them will keep the worst of the fraying on the inside.
  • Soak clothes in salt water— Salt is inexpensive, environmentally friendly and great for keeping your colors bright. Before you wash that colorful new top, soak it overnight in salt water. Simply fill your washer with cold water, add 1/4 to 1/2 cup of salt, and then add your clothes. In the morning, just add detergent and run the washer as you normally would. You can add additional clothes at this point, too — just be sure not to overfill the washer.
  • Wash in cold water— Washing in cold water instead of hot not only helps keep your colors bright, it also conserves energy and saves you money. For best results, use a detergent formulated for bright clothes and cold-water washing.

Read More 6 Ways to Cut Down Energy Costs In The Summer

Removing Wrinkles from Permanent Press Clothing

I do not like to iron! I want to pick out an outfit, put it on, and then be on my way.  I do not want to pick out an outfit, get the iron and ironing board out, and then iron it. It takes more time out of my schedule if I have to iron, and if you’re in a rush, it can be stressful! Here are a few of my ”tried and true” tips to help you out.

Be sure to dry permanent press clothing in a gentle/low heat dryer, not HOT!  Hot will only make a wrinkled mess and can melt the fabric. If you forget your clothes and don’t pull them out of the dryer in time, and they happened to get wrinkled, all you have to do is place a damp bath towel in with your clothes on gentle/low heat and dry for a few more minutes. Be sure to take them out just before or as soon as they are dry and lay flat or hang on a hanger.

After you’ve washed and dried your clothes, remove them immediately from the dryer. Then with a little spray bottle filled with water, spray the collar, button hole placard, and the sleeve edges. Then quickly “Finger Press” those focal points to be smooth and flat so they are no longer folded, curled, or crinkly. This easy finishing touch makes a big difference for permanent press shirts to look so much nicer….and it’s easy! No Iron involved!

If you do end up needing to get the dreaded iron out, then try to iron your clothes with a damp cloth. Place the damp cloth on top of the garment and iron. This will steam the fabric and it won’t be too hot. Try a small spot first to see if this will work on the fabric. Remember, too hot of a dryer or iron on permanent press fabric can melt it.

Read More 6 Ways to Cut Down Energy Costs In The Summer

Proper Care For Your Sneakers

Have you ever looked down at your white sneakers and been self-conscious?  If you have, then follow these easy to do steps and feel good about your white, almost new looking, shoes.

First of all, start with preventative care.  Grab a bottle of stain repellent at the shoe store, or anywhere they carry shoe supplies, and spray your shoes. Simply spray the repellent evenly on the surface of your shoes and let them dry overnight. Give your shoes a nice cleaning every few weeks to ensure they stay looking brand new.

Next, clean the soles. When the soles or the rubber part on your favorite pair of shoes needs a good cleaning, give them a good scrub. Try this one spot-cleaning method that’s sure to work – and it’s probably not what you think. Pick up a Magic Eraser next time you’re in the store, because it will soon become your go-to for keeping your sneakers white. Simply wet the Magic Eraser with water, and rub your shoes in a circular motion to watch the eraser work its magic.

Last, but not least – don’t forget the shoelaces. Remove your shoelaces from your sneakers. Fill your sink with hot water and add a few dashes of your favorite laundry detergent. Massage the laces between your thumb and index finger. You can also use the detergent and a toothbrush to get a deep cleaning. Squeeze the laces in a towel or paper towel to get out excess water, then hang them to dry.

Specialty sneakers.  Sometimes sneakers have a different type of material that needs to be cleaned a little bit differently.

How to Clean:

White canvas sneakers: Combine baking soda with an equal amount of a mixture that’s half water and half hydrogen peroxide until it forms a paste. After making sure all excess dirt is brushed off your sneakers, apply the mixture. Let your shoes sit for a few hours until the mixture has hardened. Shake off the hardened mixture and use an old toothbrush or crumpled up paper towel to remove the excess paste. You’ll notice those sneakers are way whiter! If the sneakers are still damp or wet let them dry before wearing them.

White leather sneakers: It might sound too good to be true, but getting your favorite white leather sneakers looking good-as-new, is as easy as taking a toothbrush with your favorite white toothpaste to the surfaces of the shoe. Use warm water with the toothpaste. You can even add sugar to the toothpaste to create an exfoliate effect for any areas where dirt seems to be caked on. Wipe with a clean towel or paper towel. Again, if the sneakers are still damp or wet let them dry before wearing them.


Read More 6 Ways to Cut Down Energy Costs In The Summer

The Mystery of Laundry Symbols

As if life wasn’t confusing enough with emoji’s and acronyms – now we have to deal with squares, circles, triangles, lines and dots on the labels of our clothing! However, clothing-care symbols are a code worth knowing.

The American Society for Testing and Materials, ASTM International, put out a standardized set of care symbols with the goal of creating a universally understood “laundry language”.

ASTM symbols follow a simple scheme and a set order: wash (tub shape), bleach (triangle), dry (square), iron (iron) and special care (circle). A circle by itself usually means dry cleaning or wet cleaning. A circle (special care) inside a square (drying) changes “dry” to “tumble dry.”

Adding lines, dots and other marks modify these base symbols and adds info. For example, a large X through a symbol offers a warning, where an empty symbol often means that any version of what the symbol represents is OK to use. A crossed-out triangle means do not bleach, where an empty triangle tells you that any bleach will do. Adding two parallel diagonal lines means to use only non-chlorine/oxygen bleach.

Clear as mud?  Don’t worry, I’ve included a chart to help you decipher what seem to be ancient Egyptian hieroglyphics:


Read More 6 Ways to Cut Down Energy Costs In The Summer

Avoid Over-Stuffing the Washing Machine

We have been asked from time to time: “How do you know when the washing machine is full enough?” and “Do you stuff it full, or just put a few things in at a time?”. These are good questions, and vary from machine to machine.

Overstuffing is NEVER a good idea.  An overstuffed load will not come clean!

Clothes need a certain amount of room in the washer to move around, and a sufficient amount of water and detergent is needed.  The extra room allows them to move against each other, and that abrasion helps get them clean.  If the clothes aren’t subjected to enough water the dirt, grime, sweat and detergent won’t be rinsed from the fabric. And that means dingy, still dirty clothes. Gross!

Overstuffing can cause clothes to wrinkle since there is not enough room in the drum of the washer for them to move around.

When you move your clothes from the washer to the dryer and you notice every item is wrinkled, it’s a sure sign you’ve overloaded the machine.

Overloading can cause your clothes to pill more readily.  When overcrowded, the clothes rub against each other too much and this abrasion causes them to look older faster and to pill. Pilling is a surface defect caused by wear, and causes little fiber balls to form.

Guide to Load Sizing

Keep in mind that these are loosely loaded clothes in the washer.  If you have to push your clothes down, or in for front load washers, to make room for more in the washer…then you’ve put way too many in there.

Small Load – fills about 1/3 of your machine.

Medium Load – fills about 1/2 of your machine.

Large Load – fills about 3/4 of your machine.

Read More 6 Ways to Cut Down Energy Costs In The Summer

Keeping Pillows Clean


Over-sized, bulky and awkward – sometimes it’s hard to know how to wash your pillows.  Just remember with all of the germs, kids, pets, and guests it’s important to remember to wash them.The best way, plain and simple; machine wash your pillows. Most down and synthetic pillows can be machine washed and dried on low heat, but check the label to be sure.

You’ll want to wash and dry at least two pillows at a time to keep your machine balanced, but take care not to stuff too many in at once. Pillows need plenty of water to get thoroughly clean, and plenty of space to get thoroughly dry. Just follow these simple steps and you’ll have clean, fluffy pillows.

NOTE: Foam pillows should not be washed! Sprinkling them with cornstarch, letting them sit for an hour or longer, then vacuuming thoroughly instead.

Detergent / Water Temperature

Make sure you use something that’s fragrance-free and will rinse clean.  Homemade laundry soap is always a good choice: 2 cups soap flakes and 1 cup each baking soda, washing soda, and borax. Water needs to be 140 degrees or higher to kill dust mites, so make sure your water heater isn’t set too low. It’s good to consider an extra spin cycle to squeeze out as much dampness as possible.

Drying

Make sure you dry pillows completely, even a little dampness could reintroduce the very mildew, bacteria, and dust mites you’re trying to avoid. Dry on low, checking them every 20 to 30 minutes to ensure even drying. For extra fluff, dry with dryer balls or a tennis ball in a sock.

Freshening Between Drying

Put your pillows in the dryer on “air fluff” every few months, to get rid of much of the dust.  If you can handle a little bit of the smell until it dissipates, you can include a vinegar-dampened washcloth, since vinegar is so good at killing mold and mildew.

Pillow Protectors

Removable pillow protectors buy you more time between full-on pillow cleaning.  Simply remove and machine-wash protectors in hot water once a month.

Read More 6 Ways to Cut Down Energy Costs In The Summer

When To Skip The Fabric Softener

Fabric softeners and dryer sheets make our clothes and linens feel soft and fluffy, smell great and remove static, but did you know there are certain types of fabric that should NEVER have fabric softeners? Before you wash, please read. I’ll list some effective alternatives below as well.

Athletic Wear

Most workout clothes are designed to wick moisture away from your body and dry quickly. Fabric softeners and dryers sheets leave a coating behind, that cause moisture to become locked into the fabric and keep it from drying. This leads to permanent odor from the bacteria locked in the fabric. Wash these garments in a cold, gentle cycle and air dry.

Microfiber Cloths

Microfiber is relatively durable, but it becomes pretty useless when the fibers absorb the waxy residue that fabric softeners and dryer sheets leave behind. It’s tempting to use because microfiber is notorious for static cling when it comes out of the dryer. Instead, try tossing a ball of aluminum foil in the dryer with microfiber items to release the static charge.

Children’s Sleepwear

 Most infant and child sleepwear is designed to be fire resistant for safety reasons. Wax from fabric softener residue can cause the fabric to lose its fire-resistance quality and can make it highly flammable. Instead of using fabric softener or a dryer sheet, add vinegar to the rinse cycle in the washer. It will soften the fabric and reduce static cling. For those extra static clingy PJs, do the vinegar rinse in the washer AND add a foil ball in the dryer.

Alternatives

Soften and reduce static cling with these gentle, fabric-friendly options:

Vinegar Rinse

Add ½ cup distilled white vinegar into your washer’s softener dispenser (or use a Downy ball). The smell will disappear in the dryer.

Wool Dryer Balls

You can find wool dryer balls on Amazon for about the same price as a couple of bottles of fabric softener except these will last A LOT longer. Toss 5-6 into the dryer to soften a load of clothes. They’ll also help larger loads dry more quickly and evenly.

Aluminum Foil

Grab the Aluminum foil from the cabinet, pull a 12”-18” sheet and crush it into a ball. Toss one into the dryer to reduce static. The ball will shrink and tighten as it’s used. Replace once the edges begin to crack or pull apart.

Read More 6 Ways to Cut Down Energy Costs In The Summer

Grease Stain Removal

You probably already have some of these cleaning agents in your home, and a couple that might be worth bringing home.  Here’s how to take grease stains off clothes, step by step.

Dish Soap and Hot Water

Treat stained clothes the same way you would a sink full of greasy dishes – remove grease from the surface with dish-washing liquid.  Dish detergent is designed to break up surface grease and allow it to rinse away.

  • Place the garment stain-side down on white paper towels. (Printed paper towels could transfer ink color to your clothes.)
  • Squirt a dime-size amount of dishwashing liquid on the backside of the grease stains. Gently rub the dish detergent into the stain center and work your way to the edges. Give it a minute or so to work its breakdown magic.
  • Rinse the treated area under warm to hot running water for a minute or so to remove the dish detergent. The water temperature will depend on what the fabric can handle. For 100 percent cotton, you can usually use hot water.
  • Follow the rinse with a spin in the washing machine, using the hottest water that’s safe for the fabric and your regular laundry detergent.  If you can’t read the clothing label care tab, choose a warm water wash.

Laundry Detergent Pre-treatment

Rub a liquid laundry detergent into the stain, and let sit for 3-5 minutes.

Wash the stained item separately from the rest of your clothes in the hottest recommended water, adding a little bleach or bleach alternative to the wash water. Extend the wash cycle to give the garment some extra time in the spin cycle.

Absorbent Powder

Another good tip that works on grease stains that are fresh is to use absorbent powder (such as cornstarch, salt, baking powder or talcum powder).

  • Apply the absorbent of choice, and let it set until the powder has absorbed as much of the grease stain as possible. Brush away the absorbent remnants with a stiff-bristle brush.

WD-40 and Dish Detergent

Place the garment on paper towels, grease stain side up. Spray the greasy area with WD-40. Let stand 10 minutes.

  • Turn the garment over and spray the underside  as well. Allow to sit another 10 minutes.
  • Using paper towels, blot on some hand dishwashing liquid, replacing the towels as they absorb the grease.
  • Rinse the treated area, and wash separately from the rest of your laundry.

Lestoil Heavy Duty Cleaner

Lestoil Heavy Duty Cleaner is made by Clorox. It safely removes oil spots, grease stains and tar from washable fabrics. It’s effective and easy to use, but it does have a very strong smell.

Simply pour Lestoil onto the greasy stain and let it soak in for about 20 minutes before washing. And if you’re washing a huge greasy load of laundry, add some to the wash water to get the load clean and grease-free.

Lestoil is also good for removing stains from fabric on sofas, chairs, carpets, and concrete driveways.

Last But Not Least

Inspect the treated area before drying to ensure the greasy stains are completely removed. If you can still see any residue, repeat the pre-treating and washing process until clear.

Read More 6 Ways to Cut Down Energy Costs In The Summer

Remove Embarrassing Underarm Stains

Stains occur when the aluminum in your antiperspirant or deodorant combines with the salt in your sweat. The stains are notoriously difficult to get rid of with normal washing in the laundry machine. We recommend doing a pre-test on a small area before trying.

Method #1

You will need:

  • 3% hydrogen peroxide
  • Dish soap
  • Baking soda
  • Toothbrush

Apply the ingredients directly to the shirt, use an old toothbrush to work them in for a minute, and then let the shirt sit for at least an hour before putting it in the washing machine.

Method #2

You will need:

  • OxiClean
  • Toothbrush

Fill up a sink with warm water and mix it with one scoop of OxiClean.  Place your shirt in the sink, making sure the yellow stains are completely submerged. For mild stains, just let the shirt sit for an hour. For more stubborn stains, rub a thick mixture of OxiClean and water on the stain, and let the shirt sit overnight before putting it in the diluted mixture.  After you’re done soaking the shirt, scrub the stain with the toothbrush, then rinse and launder as usual.

To prevent the stains in the first place, Degree deodorant says it helps to wear loose clothing, make sure your antiperspirant deodorant is dry before you get dressed and don’t use too much product.

Read More 6 Ways to Cut Down Energy Costs In The Summer
bottom Gears Mobile bottom Gears