Hieroglyphics or Laundry Symbols?

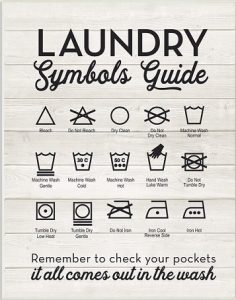
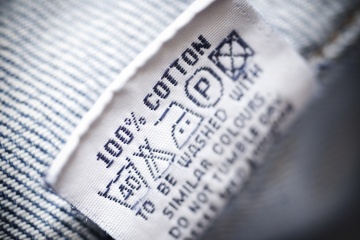
As if life wasn’t confusing enough with emoji’s and acronyms – now we have to deal with squares, circles, triangles, lines and dots on the labels of our clothing! However, clothing-care symbols are a code worth knowing.

The American Society for Testing and Materials, ASTM International, put out a standardized set of care symbols with the goal of creating a universally understood “laundry language”.

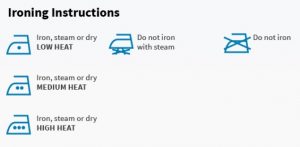
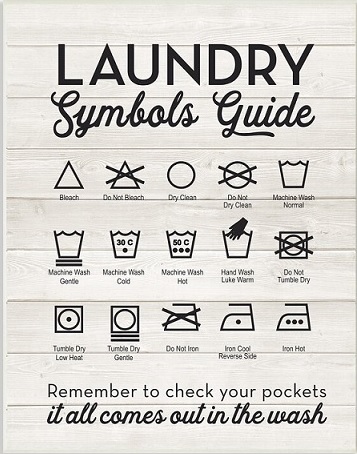
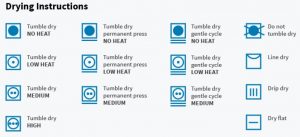
ASTM symbols follow a simple scheme and a set order: wash (tub shape), bleach (triangle), dry (square), iron (iron) and special care (circle). A circle by itself usually means dry cleaning or wet cleaning. A circle (special care) inside a square (drying) changes “dry” to “tumble dry.”

Adding lines, dots and other marks modify these base symbols and adds info. For example, a large X through a symbol offers a warning, where an empty symbol often means that any version of what the symbol represents is OK to use. A crossed-out triangle means do not bleach, where an empty triangle tells you that any bleach will do. Adding two parallel diagonal lines means to use only non-chlorine/oxygen bleach.

Clear as mud?  Don’t worry, I’ve included a chart to help you decipher what seem to be ancient Egyptian hieroglyphics:
Read More 6 Ways to Cut Down Energy Costs In The Summer

Wrinkle Free Permanent Press Clothing – Without the Iron!

I do not like to iron! I want to pick out an outfit, put it on, and then be on my way.  I do not want to pick out an outfit, get the iron and ironing board out, and then iron it. It takes more time out of my schedule if I have to iron, and if you’re in a rush, it can be stressful! Here are a few of my ”tried and true” tips to help you out.

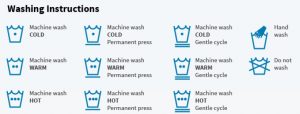
Be sure to dry permanent press clothing in a gentle/low heat dryer, not HOT!  Hot will only make a wrinkled mess and can melt the fabric. If you forget your clothes and don’t pull them out of the dryer in time, and they happened to get wrinkled, all you have to do is place a damp bath towel in with your clothes on gentle/low heat and dry for a few more minutes. Be sure to take them out just before or as soon as they are dry and lay flat or hang on a hanger.

After you’ve washed and dried your clothes, remove them immediately from the dryer. Then with a little spray bottle filled with water, spray the collar, button hole placard, and the sleeve edges. Then quickly “Finger Press” those focal points to be smooth and flat so they are no longer folded, curled, or crinkly. This easy finishing touch makes a big difference for permanent press shirts to look so much nicer….and it’s easy! No Iron involved!

If you do end up needing to get the dreaded iron out, then try to iron your clothes with a damp cloth. Place the damp cloth on top of the garment and iron. This will steam the fabric and it won’t be too hot. Try a small spot first to see if this will work on the fabric. Remember, too hot of a dryer or iron on permanent press fabric can melt it.

Read More 6 Ways to Cut Down Energy Costs In The Summer

How to Avoid Ironing

I DO NOT like to iron! I want to pick out an outfit, put it on, and then be on my way.  It takes more time out of my schedule, and if you are in a rush, it can be stressful! Here are a few of my “tried and true” tips to help you out.

Be sure to dry permanent press clothing in a gentle/low heat dryer, not HOT!  Hot will only make a wrinkled mess and can melt the fabric. If you forget your clothes and don’t pull them out of the dryer in time, and they happened to get wrinkled, all you have to do is place a damp bath towel in with your clothes on gentle/low heat and dry for a few more minutes. Be sure to take them out just before or as soon as they are dry and lay flat or hang on a hanger.

After you have washed and dried your clothes, remove them immediately from the dryer. Then with a little spray bottle filled with water, spray the collar, buttonhole placard, and the sleeve edges. Then quickly “Finger Press” those focal points to be smooth and flat so they are no longer folded, curled, or crinkly. This easy finishing touch makes a big difference for permanent press shirts to look so much nicer….and it’s easy! No Iron involved!

If you do end up needing to get the dreaded iron out, then try to iron your clothes with a damp cloth. Place the damp cloth on top of the garment and iron. This will steam the fabric and it won’t be too hot. Try a small spot first to see if this will work on the fabric. Remember, too hot of a dryer or iron on permanent press fabric can melt it.


Read More 6 Ways to Cut Down Energy Costs In The Summer

How to Avoid Ironing

I DO NOT like to iron! I want to pick out an outfit, put it on, and then be on my way.  I do not want to pick out an outfit, get the iron and ironing board out, and then iron it. It takes more time out of my schedule if I have to iron, and if you’re in a rush, it can be stressful! Here are a few of my ”tried and true” tips to help you out.

Be sure to dry permanent press clothing in a gentle/low heat dryer, not HOT!  Hot will only make a wrinkled mess and can melt the fabric. If you forget your clothes and don’t pull them out of the dryer in time, and they happened to get wrinkled, all you have to do is place a damp bath towel in with your clothes on gentle/low heat and dry for a few more minutes. Be sure to take them out just before or as soon as they are dry and lay flat or hang on a hanger.

After you’ve washed and dried your clothes, remove them immediately from the dryer. Then with a little spray bottle filled with water, spray the collar, button holes, and the sleeve edges. Then quickly “Finger Press” those focal points to be smooth and flat so they are no longer folded, curled, or crinkly. This easy finishing touch makes a big difference for permanent press shirts to look so much nicer….and it’s easy! No Iron involved!

If you do end up needing to get the dreaded iron out, then try to iron your clothes with a damp cloth. Place the damp cloth on top of the garment and iron. This will steam the fabric and it won’t be too hot. Try a small spot first to see if this will work on the fabric. Remember, too hot of a dryer or iron on permanent press fabric can melt it.

Read More 6 Ways to Cut Down Energy Costs In The Summer

Removing Wrinkles from Permanent Press Clothing

I do not like to iron! I want to pick out an outfit, put it on, and then be on my way.  I do not want to pick out an outfit, get the iron and ironing board out, and then iron it. It takes more time out of my schedule if I have to iron, and if you’re in a rush, it can be stressful! Here are a few of my ”tried and true” tips to help you out.

Be sure to dry permanent press clothing in a gentle/low heat dryer, not HOT!  Hot will only make a wrinkled mess and can melt the fabric. If you forget your clothes and don’t pull them out of the dryer in time, and they happened to get wrinkled, all you have to do is place a damp bath towel in with your clothes on gentle/low heat and dry for a few more minutes. Be sure to take them out just before or as soon as they are dry and lay flat or hang on a hanger.

After you’ve washed and dried your clothes, remove them immediately from the dryer. Then with a little spray bottle filled with water, spray the collar, button hole placard, and the sleeve edges. Then quickly “Finger Press” those focal points to be smooth and flat so they are no longer folded, curled, or crinkly. This easy finishing touch makes a big difference for permanent press shirts to look so much nicer….and it’s easy! No Iron involved!

If you do end up needing to get the dreaded iron out, then try to iron your clothes with a damp cloth. Place the damp cloth on top of the garment and iron. This will steam the fabric and it won’t be too hot. Try a small spot first to see if this will work on the fabric. Remember, too hot of a dryer or iron on permanent press fabric can melt it.

Read More 6 Ways to Cut Down Energy Costs In The Summer

The Mystery of Laundry Symbols

As if life wasn’t confusing enough with emoji’s and acronyms – now we have to deal with squares, circles, triangles, lines and dots on the labels of our clothing! However, clothing-care symbols are a code worth knowing.

The American Society for Testing and Materials, ASTM International, put out a standardized set of care symbols with the goal of creating a universally understood “laundry language”.

ASTM symbols follow a simple scheme and a set order: wash (tub shape), bleach (triangle), dry (square), iron (iron) and special care (circle). A circle by itself usually means dry cleaning or wet cleaning. A circle (special care) inside a square (drying) changes “dry” to “tumble dry.”

Adding lines, dots and other marks modify these base symbols and adds info. For example, a large X through a symbol offers a warning, where an empty symbol often means that any version of what the symbol represents is OK to use. A crossed-out triangle means do not bleach, where an empty triangle tells you that any bleach will do. Adding two parallel diagonal lines means to use only non-chlorine/oxygen bleach.

Clear as mud?  Don’t worry, I’ve included a chart to help you decipher what seem to be ancient Egyptian hieroglyphics:
 

Read More 6 Ways to Cut Down Energy Costs In The Summer

Removing Stubborn Creases

Do your clothes develop stubborn creases that seem impossible to iron out? Fortunately there are ways to get rid of unwanted, stubborn creases and it’s not too hard to do it.

We always start by washing the garment first. This should loosen it up a bit. After you wash, then begin the ironing.  Spray starch heavily on the crease, then move the iron slowly, continuing to press the iron into the crease. In most cases this should do the trick for getting out that stubborn crease.

If washing and ironing don’t work however, you do have a couple of options. You can remove the crease mark by rubbing a bar of soap along the line on the inside before pressing. Also you can pursue the vinegar method. Combine equal parts of vinegar and water and spray as you press out the crease. This will probably make your clothes smell a little funny so you’ll probably want to wash the garment again before wearing. (The extra wash should also help with getting that crease out).

Another tip you can try is taking a mixture of two parts hair conditioner and one part water and rubbing that on the crease. With both of the latter techniques you will want to test it in an inconspicuous part of the item or on a completely different item all together. Make sure it’s conducive to your garments before trying.

Creases don’t have to be the end-all-be-all to your clothes. You can beat those creases if you follow these simple pieces of advice.


Read More 6 Ways to Cut Down Energy Costs In The Summer

How To Avoid the Iron!


I DO NOT like to iron! I want to pick out an outfit, put it on, and then be on my way.  I do not want to pick out an outfit, get the iron and ironing board out, and then iron it. It takes more time out of my schedule if I have to iron, and if you’re in a rush, it can be stressful! Here are a few of my ”tried and true” tips to help you out.

Be sure to dry permanent press clothing in a gentle/low heat dryer, not HOT!  Hot will only make a wrinkled mess and can melt the fabric. If you forget your clothes and don’t pull them out of the dryer in time, and they happened to get wrinkled, all you have to do is place a damp bath towel in with your clothes on gentle/low heat and dry for a few more minutes. Be sure to take them out just before or as soon as they are dry and lay flat or hang on a hanger.

After you’ve washed and dried your clothes, remove them immediately from the dryer. Then with a little spray bottle filled with water, spray the collar, button hole placard, and the sleeve edges. Then quickly “Finger Press” those focal points to be smooth and flat so they are no longer folded, curled, or crinkly. This easy finishing touch makes a big difference for permanent press shirts to look so much nicer….and it’s easy! No Iron involved!

If you do end up needing to get the dreaded iron out, then try to iron your clothes with a damp cloth. Place the damp cloth on top of the garment and iron. This will steam the fabric and it won’t be too hot. Try a small spot first to see if this will work on the fabric. Remember, too hot of a dryer or iron on permanent press fabric can melt it.

Read More 6 Ways to Cut Down Energy Costs In The Summer

How To Remove Stubborn Creases

Do your clothes develop stubborn creases that seem impossible to iron out? Fortunately there are ways to get rid of unwanted, stubborn creases and it’s not too hard to do it.

We always start by washing the garment first. This should loosen it up a bit. After you wash, then begin the ironing.  Spray starch heavily on the crease, then move the iron slowly, continuing to press the iron into the crease. In most cases this should do the trick for getting out that stubborn crease.

If washing and ironing don’t work however, you do have a couple of options. You can remove the crease mark by rubbing a bar of soap along the line on the inside before pressing. Also you can pursue the vinegar method. Combine equal parts of vinegar and water and spray as you press out the crease. This will probably make your clothes smell a little funny so you’ll probably want to wash the garment again before wearing. (The extra wash should also help with getting that crease out).

Another tip you can try is taking a mixture of two parts hair conditioner and one part water and rubbing that on the crease. With both of the latter techniques you will want to test it in an inconspicuous part of the item or on a completely different item all together. Make sure it’s conducive to your garments before trying.

Creases don’t have to be the end-all-be-all to your clothes. You can beat those creases if you follow these simple pieces of advice.

Read More 6 Ways to Cut Down Energy Costs In The Summer

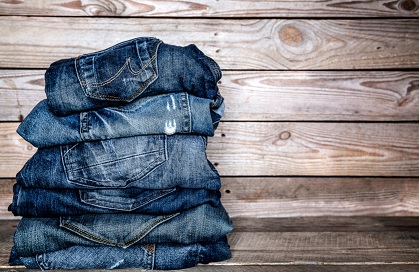
How To Wash Jeans/Denim

Chances are you bought those new jeans or that denim jacket because you liked the color and texture of the denim, right? Well, those new jeans and denim jackets have been dyed to get that color and rough-and-tumble look to last through multiple washing’s.

To keep jeans looking good, you’ll need to launder your denim carefully to keep the look you love.

1. Always wash new jeans separately.

Dark wash jeans should be washed separately the first time, and in a laundry detergent designed to keep their dark colors safe and intact. The dye in most jeans transfers readily during the laundry cycle, so it’s important to bathe them all by themselves.

2. Turn jeans inside-out before washing.

Washed jeans should be laundered inside-out in warm or cool water to prevent fading (unless you want fading, of course.) Keep both new and washed jeans away from laundry detergents with bleach for the same reason. This is one time you’ll want to use a basic laundry detergent without additives or boosters.

3. Avoid frequent tumble drying and dry cleaning.

Avoid frequent tumble-drying and dry cleaning. Heat may damages fibers, and dry cleaning may cause discoloration. When necessary, tumble dry while the dryer is cool and use the delicate setting.

To extend the lifespan of jeans, lay them flat to dry whenever possible instead of tossing them into the dryer.

4. Don’t spot clean jeans.

Don’t try to spot-clean denim. Instead, wash the entire pants so you don’t create a faded area where the spot or spill was.

5. If needed, iron jeans while damp.

This step is very easy and for those who like the crisp, pressed look. To put it simply – iron the denim while it’s still damp on the highest setting recommended for denim on your iron. Another option is to bring your jean in to us at Sapulpa Laundry. We will get your jeans crisp and pressed with a crease or not, and starched or not – however you prefer.

Read More 6 Ways to Cut Down Energy Costs In The Summer
bottom Gears Mobile bottom Gears