Grease Stain Removal

You probably already have some of these cleaning agents in your home, and a couple that might be worth bringing home.  Here’s how to take grease stains off clothes, step by step.

Dish Soap and Hot Water

Treat stained clothes the same way you would a sink full of greasy dishes – remove grease from the surface with dish-washing liquid.  Dish detergent is designed to break up surface grease and allow it to rinse away.

  • Place the garment stain-side down on white paper towels. (Printed paper towels could transfer ink color to your clothes.)
  • Squirt a dime-size amount of dishwashing liquid on the backside of the grease stains. Gently rub the dish detergent into the stain center and work your way to the edges. Give it a minute or so to work its breakdown magic.
  • Rinse the treated area under warm to hot running water for a minute or so to remove the dish detergent. The water temperature will depend on what the fabric can handle. For 100 percent cotton, you can usually use hot water.
  • Follow the rinse with a spin in the washing machine, using the hottest water that’s safe for the fabric and your regular laundry detergent.  If you can’t read the clothing label care tab, choose a warm water wash.

Laundry Detergent Pre-treatment

Rub a liquid laundry detergent into the stain, and let sit for 3-5 minutes.

Wash the stained item separately from the rest of your clothes in the hottest recommended water, adding a little bleach or bleach alternative to the wash water. Extend the wash cycle to give the garment some extra time in the spin cycle.
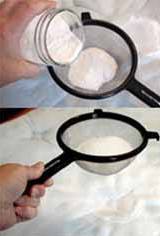
Absorbent Powder

Another good tip that works on grease stains that are fresh is to use absorbent powder (such as cornstarch, salt, baking powder or talcum powder).

  • Apply the absorbent of choice, and let it set until the powder has absorbed as much of the grease stain as possible. Brush away the absorbent remnants with a stiff-bristle brush.

WD-40 and Dish Detergent

Place the garment on paper towels, grease stain side up. Spray the greasy area with WD-40. Let stand 10 minutes.

  • Turn the garment over and spray the underside  as well. Allow to sit another 10 minutes.
  • Using paper towels, blot on some hand dishwashing liquid, replacing the towels as they absorb the grease.
  • Rinse the treated area, and wash separately from the rest of your laundry.

Lestoil Heavy Duty Cleaner

Lestoil Heavy Duty Cleaner is made by Clorox. It safely removes oil spots, grease stains and tar from washable fabrics. It’s effective and easy to use, but it does have a very strong smell.

Simply pour Lestoil onto the greasy stain and let it soak in for about 20 minutes before washing. And if you’re washing a huge greasy load of laundry, add some to the wash water to get the load clean and grease-free.

Lestoil is also good for removing stains from fabric on sofas, chairs, carpets, and concrete driveways.

Last But Not Least

Inspect the treated area before drying to ensure the greasy stains are completely removed. If you can still see any residue, repeat the pre-treating and washing process until clear.

Read More 6 Ways to Cut Down Energy Costs In The Summer

Hieroglyphics or Laundry Symbols?

As if life wasn’t confusing enough with emoji’s and acronyms – now we have to deal with squares, circles, triangles, lines and dots on the labels of our clothing! However, clothing-care symbols are a code worth knowing.

The American Society for Testing and Materials, ASTM International, put out a standardized set of care symbols with the goal of creating a universally understood “laundry language”.

ASTM symbols follow a simple scheme and a set order: wash (tub shape), bleach (triangle), dry (square), iron (iron) and special care (circle). A circle by itself usually means dry cleaning or wet cleaning. A circle (special care) inside a square (drying) changes “dry” to “tumble dry.”

Adding lines, dots and other marks modify these base symbols and adds info. For example, a large X through a symbol offers a warning, where an empty symbol often means that any version of what the symbol represents is OK to use. A crossed-out triangle means do not bleach, where an empty triangle tells you that any bleach will do. Adding two parallel diagonal lines means to use only non-chlorine/oxygen bleach.

Clear as mud?  Don’t worry, I’ve included a chart to help you decipher what seem to be ancient Egyptian hieroglyphics:

Read More 6 Ways to Cut Down Energy Costs In The Summer

Cleaning Summertime Mildewed Towels

Its summertime and that means wet towels from the swimming pool, lake, or the beach. At some point most of us have used a towel, for whatever reason, and tossed it into the dirty laundry and forgotten it was wet. A few days later and the smell will remind you! That smell is caused by mildew that sets in, and isn’t very easy to get rid of.  Washing your towels a few times on a normal setting may get rid of that stink, but if that isn’t enough to combat the mildew smell, I’ve found a way to get your towels back in shape and get that unpleasant smell out quickly. Here is how:

  1. Place your smelly towels in the washing machine and fill with the hottest water possible. Add in 2 cups of white vinegar and let them soak for at least 30 mins. Do not add any other products (detergent, softener etc.). This will allow the vinegar to penetrate the material without interference.
  2. Run a full cycle after your towels have soaked in the vinegar water. Leaving the towels in the washer repeat step 1, only this time use baking soda instead of vinegar. Run a full cycle once again.
  3. Dry the towels on hottest setting possible until they are fully dry

Your towels will smell like brand new!

Read More 6 Ways to Cut Down Energy Costs In The Summer

Removing Chocolate Stains

Have you ever eaten a chocolate sundae and looked down to see the chocolate has dripped on your shirt?  It can almost ruin that yummy experience you just had.  Never fear, there’s ways to get rid of that chocolate stain!

  • Scrape or blot away any excess chocolate from stain. Be gentle when doing this, because you don’t want to grind the chocolate into the fibers.
  • Flush the back of the stained fabric with cold running water or soda water. Ideally, hold the fabric under the tap or saturate the stain with cold water or soda water. This will help loosen the chocolate and flush them out of the clothing fibers.
  • Rub a laundry detergent or liquid dish-washing detergent into the stain. Do this thoroughly (but not too rough) and make sure the detergent saturates the fabric. Persil liquid has a Stain Eraser Ball that you can use for pre-treating stains.

  • Soak the garment in cold water for 15 minutes, and gently rub at the stain every 3-5 minutes or so. Keep on doing this and rinsing, until the stain is gone. You may need to re-apply more detergent for a tough stain.
  • If the stain persists, apply a commercial stain remover.
  • Launder as usual in the washing machine, and the stain should be gone! If not, repeat Steps 2 to 5. Be sure to check the stain is completely gone before you tumble-dry or iron the garment.

Read More 6 Ways to Cut Down Energy Costs In The Summer

Vodka….Not just for Cocktails

When it comes to odor removal and stains, why not consider vodka? Pour some in a spray bottle, then spritz it on the musty clothes. As the alcohol evaporates, it will lift the odors away. No need to dilute the alcohol. Vodka’s odor-eliminating power comes from its high alcohol content and adding water will only weaken its potency. Best of all, even the cheapest brand will do. Make sure to choose PLAIN vodka over a flavored one, it won’t leave any sort of boozy after-smell.

Removing Stains:

Blot the stained area with a soft white cloth, if the stain is fresh or still wet, absorb as much as the stain as possible. Don’t rub a wet stain, as that may spread it and make the stain worse. Pour the vodka onto a soft white cloth and dab it over the stain. It works great on food, ink or grass-stained clothes. Vodka works much the way rubbing alcohol does to remove some types of stains, as it is another form of clear alcohol without additives.

Odor Removal:

Add 1/2 cup vodka to your regular wash and it will remove musty, mildew, smells!

Read More 6 Ways to Cut Down Energy Costs In The Summer

Brighter Cleaner Laundry


Why buy expensive or dangerous cleaning products, bleaches, or de-greasers when all you need is probably already in your pantry!

Did you know baking soda can work magic — including getting cleaner and brighter whites at a fraction of the cost.

It’s as easy as 1, 2, 3….

1) Put one cup of baking soda in your wash.

2) Then add your detergent

3) Run your wash on the normal setting and…..Ta-Da!  Brighter, cleaner whites!

Try this DIY homemade laundry detergent recipe. This is a project that will save you money and help you rid your home of toxic chemical cleaners and make your clothes brighter and cleaner in the process.

Ingredients

  • 1 bar (or 4.5 ounces) shaved bar soap (a homemade laundry bar, Ivory, or Zote)
  • 1 cup Borax
  • 1 cup baking soda

Directions

Thoroughly mix all ingredients together. Use 1 Tbsp per small load (or 2-3 Tbsp for large or heavily soiled loads) then add to your laundry.  Store remaining in a sealed container.

Keeping your colors brighter is a challenge at times. Colors fade when the chemical bonds between the dye and the fabric break down, so the best way to keep your colors bright is to wash clothes in a way that either prevents dyes from dissolving, protects the fibers in the fabric — or both. Follow these tips, and your colors will look as good as new!

  • Turn clothes inside out— According to experts, the tumbling action of the wash cycle and the dryer can cause fabric fibers to break as clothes collide into each other and against the walls of the machine. Turning clothes inside out before you wash them will keep the worst of the fraying on the inside.
  • Soak clothes in salt water— Salt is inexpensive, environmentally friendly and great for keeping your colors bright. Before you wash that colorful new top, soak it overnight in salt water. Simply fill your washer with cold water, add 1/4 to 1/2 cup of salt, and then add your clothes. In the morning, just add detergent and run the washer as you normally would. You can add additional clothes at this point, too — just be sure not to overfill the washer.
  • Wash in cold water— Washing in cold water instead of hot not only helps keep your colors bright, it also conserves energy and saves you money. For best results, use a detergent formulated for bright clothes and cold-water washing.
Read More 6 Ways to Cut Down Energy Costs In The Summer

Wrinkle Free Permanent Press Clothing – Without the Iron!

I do not like to iron! I want to pick out an outfit, put it on, and then be on my way.  I do not want to pick out an outfit, get the iron and ironing board out, and then iron it. It takes more time out of my schedule if I have to iron, and if you’re in a rush, it can be stressful! Here are a few of my ”tried and true” tips to help you out.

Be sure to dry permanent press clothing in a gentle/low heat dryer, not HOT!  Hot will only make a wrinkled mess and can melt the fabric. If you forget your clothes and don’t pull them out of the dryer in time, and they happened to get wrinkled, all you have to do is place a damp bath towel in with your clothes on gentle/low heat and dry for a few more minutes. Be sure to take them out just before or as soon as they are dry and lay flat or hang on a hanger.

After you’ve washed and dried your clothes, remove them immediately from the dryer. Then with a little spray bottle filled with water, spray the collar, button hole placard, and the sleeve edges. Then quickly “Finger Press” those focal points to be smooth and flat so they are no longer folded, curled, or crinkly. This easy finishing touch makes a big difference for permanent press shirts to look so much nicer….and it’s easy! No Iron involved!

If you do end up needing to get the dreaded iron out, then try to iron your clothes with a damp cloth. Place the damp cloth on top of the garment and iron. This will steam the fabric and it won’t be too hot. Try a small spot first to see if this will work on the fabric. Remember, too hot of a dryer or iron on permanent press fabric can melt it.

Read More 6 Ways to Cut Down Energy Costs In The Summer

Caring for Antique Linens


Some of us are fortunate enough to inherit a little piece of our family history. If we’re lucky, these items will be in good condition, but that’s not always the case. Some items may have dry rot, mouse nibbles and/or rust. You won’t be able to save these things if the fibers are already compromised. If you tug on two sides of a garment and it comes apart without much effort, your item has dry rot and has reached the end. Sometimes, you just have to let go, there’s no way to save it.

To start, here are a few items you should have on hand:
White Vinegar
Rust Remover
Restoration – (OxiClean is similar, more widely available and slightly less expensive than Restoration, but it doesn’t work as well.)
Bleach pen
Laundry detergent (simple soap, nothing added)

***PLEASE NOTE THAT I DO NOT GUARANTEE ANY METHOD THAT YOU CHOOSE TO TRY. IT ALL DEPENDS ON THE CONDITION OF THE GARMENT.***

“Restoration” and white vinegar are preferred products. Read the label and use common sense. You may only need to use “Restoration” for your initial laundering to remove storage dirt. You can also use “Restoration” in the washing machine with your laundry, too. It removes odors, age spots, storage stains, label stains and often, some rust. If it doesn’t remove the rust, try using “Whink Rust & Stain Remover.” Be aware that if rust has already eaten away the fibers that you may be left with a hole where the rust had been after cleaning with rust/stain remover.

Use “Restoration” first and, if stains remain after two or three sessions with it, put the dampened piece outside in bright sunshine for a day. This is often a magical solution. Horrible stains will usually disappear within an hour. This is the least invasive method. It is effective and it’s free – it also sanitizes. However, sunlight does bleach and weaken fibers over time. Sunlight is destructive so I am not suggesting that you constantly subject your fragile items to sunlight. This method, used once or twice on a piece that would otherwise need to be thrown away, can be very helpful. If the stains persist, you may need to resort to using bleach with laundry detergent. I like to have a bleach pen on hand because it allows me to pinpoint where I apply the bleach. After using bleach, always rinse with white vinegar, then rinse again with clear water.

Step 1. Use hot water with “Restoration” until the water turns clear. (approx. 4- 6 hours or overnight) If the water is not clear after overnight soak, repeat this step. Extremely filthy items may require several soakings.

Step 2. Drain and refill container with water; add white vinegar (a splash or a cup, depending on container size); swish around and soak for 10-20 minutes.

Step 3. Drain and refill with lots of clear water; swish around and soak for 15 minutes. Done!

If stains remain, repeat entire process.
If there is rust, use rust remover on wet fabric, then repeat from Step 2.

If stains remain, lay wet/damp item outdoors in sunshine.

If stains remain, soak with laundry detergent and small amount of bleach. Or use a bleach pen on small stains. It is better to soak longer using very little bleach.

IMPORTANT!
DO NOT mix chemical treatments. Pre-rinse items that may have bleach or detergent residue with vinegar to neutralize the bleach and then rinse twice in clear water before trying another treatment. DO NOT bleach anything after using OxiClean or peroxide or any other chemical treatment. Your items may turn permanently blue, or worse Rinse really well before trying any other product.

Read More 6 Ways to Cut Down Energy Costs In The Summer

Don’t Forget To Clean Your Mattress

Dust, mold, mildew, body sweat, fungal spores, allergens – all make mattresses the ideal breeding ground for bacteria and dust mites.  If you’re as grossed out as I am by this, keep reading and learn how to clean your mattress for a better, cleaner sleep.

Vacuum It

Vacuum your mattress every month or so or as often as every time you change the sheets, if you or family members have severe allergies. Run the vacuum very slowly over the mattress, so it has time to inhale the dust and dust mites. Break out the crevice tool for the edges and crevices.

Treat Stains

Treat any stain immediately. The longer liquids sit in a mattress, the likelier you are to foster mold and mildew growth.

This may sound crazy, but use foaming shaving cream for mattress cleaning, in part because of its thickness. Liquids will soak right through a mattress, not allowing adequate time to dissolve the stain. Foaming shaving cream contains denatured alcohol, which is a stain remover, and it’s thick, so it sits on the surface to work on the stain. Wait 10 to 15 minutes, wipe with a damp cloth, and rinse with a 50/50 vinegar/water solution. Repeat if necessary.

Other helpful solutions for common mattress stains:

  • Blood: A 50/50 hydrogen peroxide/water solution.
  • Urine, fecal matter, or vomit: An enzyme cleaner, such as Bac-Out by BioClean, or Nature’s Miracle, available at pet stores.

Freshen Fast

Use a mixture of cornstarch and baking soda to remove smells.  Place in a colander and just shake the mixture on to the mattress, let it sit for a few hours or longer, then vacuum. The cornstarch will absorb body oils, while the baking soda will work on smelly odors.

Sheet Strategy
Don’t put new sheets on until evening. This will allow the mattress to air all day discouraging dust mites and bacterial growth.

Pad It
Remember, mattress pads aren’t just for comfort. They keep your mattress cleaner, too.  Wash monthly in hot water, and machine dry thoroughly, unless the tag instructs otherwise.

Read More 6 Ways to Cut Down Energy Costs In The Summer

Teaching Kids the Importance of Laundry


GIVE YOUR KIDS THEIR OWN LAUNDRY BASKET

You can find kid sized laundry baskets at Target, or Wal-Mart that are just the perfect size for one load of laundry.

The same basket can be used to carry laundry to the washing machine, carrying the clean laundry from the dryer to wherever it’s folded, and if needed, carrying the folded laundry to the dresser to be put away. Plastic baskets are easy to wipe out regularly and keep clean. When your kids get bigger and have bigger clothes, just upgrade them to a bigger basket.

The most important tip is reinforcing the habit of putting dirty clothes IN the basket, and then washing clothes when the basket gets full instead of continuing to heap clothes on top!

HAVE SET LAUNDRY DAYS

Depending on the number of kids you have, set one laundry day, give each kid their own day, or assign multiple kids per day.  Reinforce the laundry day habit by marking it on the calendar, adding it to your chore chart or maybe even an app on your phone! One week’s worth of laundry isn’t more than they can manage in one day, so it won’t be overwhelming to them.

TEACH YOUR KIDS TO DO THEIR OWN LAUNDRY

Teaching the kids to do their own laundry is probably the scariest part – but also the most liberating!

ADJUST FOR AGE

Grow your kids into these healthy laundry habits, start when they are young and eager to help and add responsibility as they grow.

Children from 2-5 can learn to put clothes in the hamper when they take them off, help load things into the washing machine, help switch over to the dryer (hand them to the child to put into the dryer), and can help put folded items in drawers.

Children from 5-7 can “fold” and put away their own clothes and load the washer and dryer with supervision at first and then increasing independence.

Children ages 8 and up can pretty much do their own laundry from start to finish. They can also assist younger siblings with the washer and dryer settings!

When my kids were little I realized that since we wash our clothes with cold water anyway, their clothes were small, and most of their wardrobe was the same color — all of their laundry could be washed together! If you want to bleach their socks or teach them to sort into lights and darks, you can do that, too, but I skipped it. Focus on checking pockets, setting aside items with stains or brand new items that haven’t been washed yet, the settings for the machines and soap, and checking the lint trap.  Observe at first and give them more freedom and independence as they get the hang of it.

TEACH YOUR KIDS TO FOLD (OR NOT)

Depending on their age, I believe the bigger goal is to have them get their clothes IN the dresser, get the drawers closed, and be able to find something to wear. I’ve learned that most kids aren’t concerned about folding but as they grow, they begin to fold their clothes on their own – especially when they see everyone else doing it. As kids grow, folding becomes more important if you want everything to fit in the drawers and not be a wrinkled mess.  At that point you will have to step in to teach them that folded clothes fit better, and look better.  They won’t like the idea of ironing!

“Important tip” here is to choose your battles, and focus on your main goal of teaching them to be responsible for their own laundry. The precision will come with time.

SOLVE YOUR SOCK ISSUES

Here’s another crazy idea – stop matching socks! Why stress yourself out? Solve your sock issues with three simple steps. First, buy all one kind of sock, and second, buy different brands (different colored toes, etc.) for each kid. They will have some other socks of course – maybe some church socks, maybe some Christmas socks but the bulk of their daily socks will be the same. Third step – skip the “folding” and assign a drawer or basket in a drawer for socks. It keeps all the socks together, and it skips the hassle of matching and folding.

All of these habits work together to create an easy laundry system your kids can help with. By having their own basket, they are responsible for their own laundry. By having laundry days and small baskets you are limiting the amount of laundry they have to wash at one time. By foregoing sorting, sock matching and folding, you’re preventing your children from becoming overwhelmed with the details of perfection and focusing instead on being responsible and the joy of independence.


Read More 6 Ways to Cut Down Energy Costs In The Summer
bottom Gears Mobile bottom Gears