Hieroglyphics or Laundry Symbols?

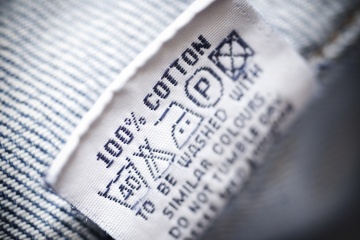
As if life wasn’t confusing enough with emoji’s and acronyms – now we have to deal with squares, circles, triangles, lines and dots on the labels of our clothing! However, clothing-care symbols are a code worth knowing.

The American Society for Testing and Materials, ASTM International, put out a standardized set of care symbols with the goal of creating a universally understood “laundry language”.

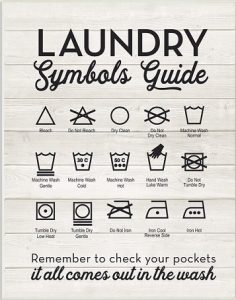
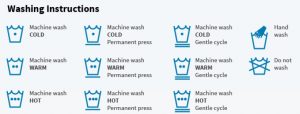
ASTM symbols follow a simple scheme and a set order: wash (tub shape), bleach (triangle), dry (square), iron (iron) and special care (circle). A circle by itself usually means dry cleaning or wet cleaning. A circle (special care) inside a square (drying) changes “dry” to “tumble dry.”

Adding lines, dots and other marks modify these base symbols and adds info. For example, a large X through a symbol offers a warning, where an empty symbol often means that any version of what the symbol represents is OK to use. A crossed-out triangle means do not bleach, where an empty triangle tells you that any bleach will do. Adding two parallel diagonal lines means to use only non-chlorine/oxygen bleach.

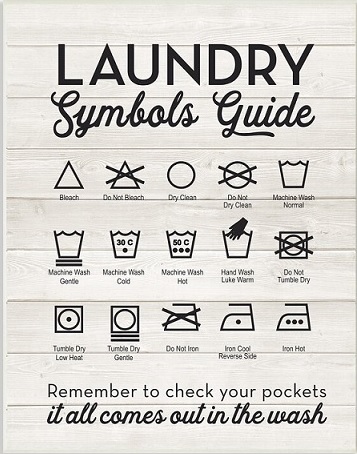
Clear as mud?  Don’t worry, I’ve included a chart to help you decipher what seem to be ancient Egyptian hieroglyphics:
Read More 6 Ways to Cut Down Energy Costs In The Summer

Properly Wash Your Clothes

Start by sorting your clothes according to colors or whites and by using the garments care labels. Some garments may say hand wash or delicate cycle etc. Washing symbols can be difficult to decipher but you can usually find the correct wash temperature by looking at the garments label (check out our blog “Understanding Laundry Language”). The machine wash symbol often looks like a tub of water, if there’s a cross through it, it can’t be machine washed.

 (Do not machine wash)

If you’re using a Tide Pod, or one of the other “pod” detergents, toss it into the drum first. The detergent will properly dissolve during the wash cycle. For small and medium loads use only one pod, for large loads use two pods. When using liquid detergent pour it into the dosing cap. Fill until line 1 for medium loads, line 3 for large loads, and line 5 for HE full loads. For powder detergent, fill the drum until line 1 for medium loads, line 3 for large loads, and line 5 for HE full loads.

Fill the machine with your clothes. Don’t overload the drum – 3/4 full is about right.

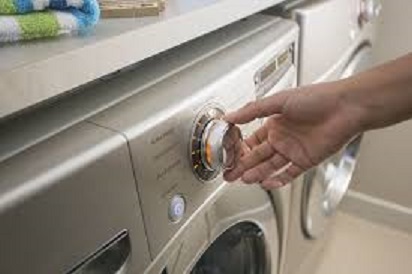
Choose a water temperature that’s right for your laundry load. Select a wash cycle.  Start the machine.

Read More 6 Ways to Cut Down Energy Costs In The Summer

Understanding Laundry Language

As if life wasn’t confusing enough with emoji’s and acronyms – now we have to deal with squares, circles, triangles, lines and dots on the labels of our clothing! However, clothing-care symbols are a code worth knowing.

The American Society for Testing and Materials, ASTM International, put out a standardized set of care symbols with the goal of creating a universally understood “laundry language”.

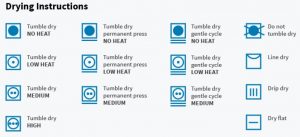
ASTM symbols follow a simple scheme and a set order: wash (tub shape), bleach (triangle), dry (square), iron (iron) and special care (circle). A circle by itself usually means dry cleaning or wet cleaning. A circle (special care) inside a square (drying) changes “dry” to “tumble dry.”

Adding lines, dots and other marks modify these base symbols and adds info. For example, a large X through a symbol offers a warning, where an empty symbol often means that any version of what the symbol represents is OK to use. A crossed-out triangle means do not bleach, where an empty triangle tells you that any bleach will do. Adding two parallel diagonal lines means to use only non-chlorine/oxygen bleach.

Clear as mud?  Don’t worry, I’ve included a chart to help you decipher what seem to be ancient Egyptian hieroglyphics:
Read More 6 Ways to Cut Down Energy Costs In The Summer

Removing Smoke Odor On Clothes

We all know that smell. The one that lingers after a night out, dinner around a camp fire or an evening spent at a concert. That lingering odor that follows you home. How do you get that annoying smoke odor out of your clothes?

WITHOUT WASHING:

Air it Out

The first thing a smoky garment needs is some fresh air.  Hang the garments in a well ventilated area…even better hang outside.  It’s amazing what a little sun and fresh air can do.

Odor Eliminating Spray or Essential Oils

If the smoke smell remains, keep the garments hanging and use an odor eliminating such as Febreze all over the front and back.  You can make your own odor eliminating spray by combining equal parts vinegar and water in a spray bottle.  Add 20-30 drops of your favorite essential oil such as lemon or mint oil.

Baking Soda

Place garment in an extra large plastic zipper bag with plenty of room for the garment to move around.  If you don’t have a large enough zipper bag – use a plastic shopping bag or garbage bag. Add ½ cup of baking soda, seal or tie the bag securely, give it a quick shake and let the entire thing sit overnight.  That will give the baking soda time to absorb the odor.  Once it’s done sitting, take the bag outside, open and shake off excess baking soda. Tumble garment in low or no heat drying cycle to help.

IN THE WASHING MACHINE:

Vinegar Pre-Soak

Before washing, give your garment a nice, long, soak.  Add 1 cup vinegar to a sink or tub, then fill with warm water. Add a few drops of your favorite essential oil for a fresh scent.  Soak garment for 30-60 minutes, then wash as directed.

Scent Booster

I’ve tried  Downy Unstopables and love what they do.  Just add a scoop to a load of smoky-smelling clothes and let them go to work.

Lemon Juice

Fresh lemon juice can do wonders for all kinds of cleaning purposes, especially in the laundry room.  Whiten whites and remove all sorts of odors, such as smoke, just by adding ½ a cup of lemon juice to the wash.

Vodka

Alcohol is a powerful odor remover and safe on most washable fabrics.  Pour ½ cup of cheap vodka (or rubbing alcohol) into the wash to eliminate tough odors.


Read More 6 Ways to Cut Down Energy Costs In The Summer

The Importance of Sorting Clothes

Interestingly enough, you’ll find several different opinions when it comes to sorting your laundry.  Our method is certainly not the only way.  If you have a method that works for you, then by all means keep doing it!  But if you’re getting worn out, torn or discolored clothes, then this article is for you.

What’s the reason to sort clothes in the first place? Do you really need to sort clothes at all?  In our opinion, you do.  Sorting clothes allows you to use different wash cycles (delicate, normal, permanent press) and also allows for washing in different temperatures.

Most importantly, sorting clothes decreases the chances that a garment is going to bleed onto another when you control the cycle type and water temperature.

Sorting Clothes by Color

There are several distinct piles in which to sort clothes: whites, darks, lights, jeans, and delicates.

∙Whites:  T-shirts, underwear, socks and other similar items fall into this category.  This pile is for white sturdy cottons that can withstand normal agitation in the washer on a warm or hot wash cycle.

∙Darks: Grays, blacks, navies, reds, dark purples and similar colors are sorted into this load.

∙Lights: More pastel-type colors such as pinks, lavenders, light blues, lights greens and yellows are placed in this pile of laundry.

∙Jeans: All items with denim material are washed together in this load.

∙Delicates: This category includes several types of clothing – lingerie, washable silks, and any clothing you’d like to keep from the harsh agitation of the washer.

Sorting Clothes by Fabric Weight

Please note that color is not the only consideration when sorting clothes. The weight of the garment should be considered as well.

For example, if you have several pairs of heavy cotton pants, or denim, then you don’t want to wash those with thin t-shirts.  Washing light- weight clothes with heavy material can possibly tear or rip those garments.

If they are placed in the dryer together, they obviously won’t dry at the same rate since one fabric is much heavier than the other.

It’s best just to separate these types of garments from the start and wash them in two separate loads.

Read More 6 Ways to Cut Down Energy Costs In The Summer

Microfiber 101

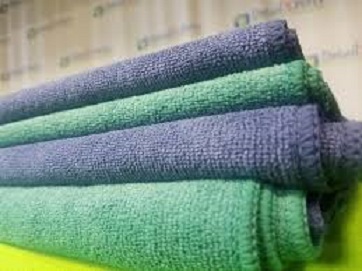
Washing and drying microfiber towels properly ensures towels will last longer, stay softer, and produce better results when trying to clean your windows, appliances, drying off your vehicle after washing, or using them for waxing your vehicle.

Step 1: Separate Your Towels

Before washing your microfiber, separate your towels into specific groups such as windows, appliances, vehicles, wheels, etc. Washing your towels in separate groups reduces the chance of cross-contamination during the washing process. If you wash your waxing towels and your window cleaning towels in the same load, wax residue can become embedded in the window towels and can cause streaks when cleaning glass, or appliances such as stainless steel.

Step 2: Use Proper Microfiber Wash

Choosing the correct microfiber wash solution is important to maintaining the condition of your microfiber. Using generic laundry detergent can reduce the life and performance of microfiber towels. We recommend only using a microfiber specific washing solution, such as Chemical Guys Microfiber Wash, to achieve the best results when washing your towels and microfiber goods. Microfiber Wash is designed to safely remove dirt and contamination from your microfiber without harming the material. Using generic laundry detergent can make microfiber feel stiff and rough. DO NOT USE FABRIC SOFTENER! Fabric softener clogs the fiber material and reduces microfiber performance. Fabric softener blocks liquids from being absorbed by the microfiber material.

Step 3: Use the Correct Wash Settings

Place your microfiber towels in the washing machine. Select “Hot” for the water temperature. Washing microfiber with hot water opens the fibers to release dirt and contamination. Add 1 oz. to 4 oz. (depending on load size) of Microfiber Wash to the machine. Press start and allow the machine to do the work.

Step 4: Drying the Microfiber

Now that the towels are washed, it’s time to dry. Machine drying is recommended to ensure the towels are clean, fluffy, and ready to detail. Place all your microfiber goods in the dryer, and set the temperature to “low”. Do not dry microfiber goods on high heat. Using high heat on microfiber can fry the polyester in the microfiber, causing the towel to feel stiff and hard. Towels that are dried on high heat can lead to scratches and swirls when used on cars, appliances or windows.

Step 5: Fold and Store

Once the towels are dry, properly fold and store them. Microfiber can easily hold dirt and dust. To ensure the towels stay clean, store the them in a clean cabinet, closet or container. Storing the towels properly can ensure that no dirt, dust, or debris lands on your towels.


Read More 6 Ways to Cut Down Energy Costs In The Summer

Choosing the Correct Water Temperature

Most people think the way to get the job done is to wash everything in a single load with cold water. That way, you get it all done at once, and there’s no color transfer between clothes, but that’s not always the case.  Washing everything together in cold will prevent color transfer, but unfortunately it won’t get everything clean.


When to wash in hot water

Hot wash works well on ground-in and hard-to-remove dirt on sturdy fabrics.

Generally speaking, you should wash white clothes in hot water. Washing colors in hot water is also recommended if the clothes are really dirty or greasy, and they’re made of sturdy, color-fast fabric. (Wash them separately, of course.)

Use it to clean seriously soiled sturdy garments (gardening or children’s clothing), and to regularly disinfect dish towels, washcloths, bath towels, bedding, and pillowcases.

Light and dark fabrics should be separated as hot water may cause these clothes to bleed.

Delicate and coarse or sturdy fabrics should be separated to prevent abrasion and protect clothes from wear and tear.


When to wash in warm water

Warm water (or permanent press wash setting) minimizes color fading and wrinkling. Wash light clothes, as well as regular and sturdy fabrics, towels, jeans, 100 percent manmade fibers, and blends of natural and manmade fibers. It’s also appropriate for moderately dirty clothes that don’t need the extra power of a hot water temperature wash.


When to wash in cold water

Washing clothes with cold water will protect most dark or bright-colored clothing from running and minimizes shrinkage. Use the cold wash cycle for lightly soiled fabrics and clothes with blood, wine or coffee stains, dark or bright colors that may run or fade, delicate fabrics including washable silk, Spandex swimsuits, and active wear; and delicate lingerie. It’s also okay for lightly soiled clothes.

There’s a misconception that washing clothes in cold water won’t get clothes clean. This is because detergent is formulated for, and fully activated in, warm water. Cooler water won’t fully activate detergent, which means you’ll need to use more to make up for the temperature difference to get your cold wash clothes clean. Thankfully there are several brands of detergent that are designed to work in all temperatures. Tide, Arm & Hammer, All, and Wisk are just a few that we recommend.

Read More 6 Ways to Cut Down Energy Costs In The Summer

Avoid Detergent Overload

Most people use far more detergent than they actually need to. Liquid, pods, powders – It’s no wonder there’s so much confusion about how to use laundry detergent correctly!  Knowing how much detergent to use can extend the life of your clothes and help conserve money by saving on the expense of detergent.

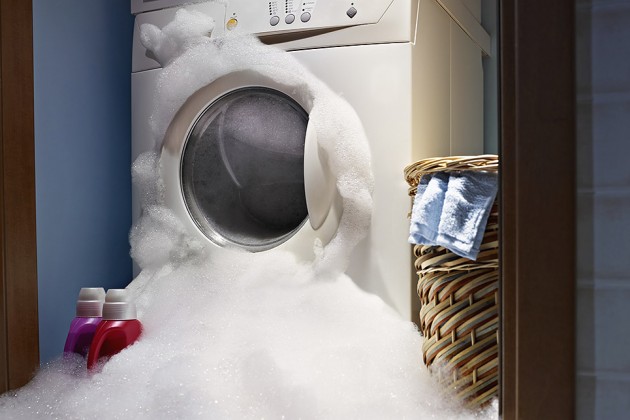
There are several factors to consider when it comes to using laundry detergent properly. First, determine what kind of detergent is best for you. Liquid detergents are easy to pour and work great for spot-cleaning grease stains and ground-in dirt. While powder detergents are good for consistent cleaning overall, too much powder can leave a milky residue on your clothes if not measured properly.  The popular pod takes the guesswork out of measuring out your detergent.  Be sure to never use regular detergent in high-efficiency (HE) washers. This will create far too many suds and can damage the washer’s mechanics over time.

Second, consider load size. Most detergent measuring caps or instructions should state the ideal amount of detergent to use for certain load sizes. Here’s a quick way to determine the load size: if the machine’s drum looks one-quarter full once all the clothes are inside, then that’s a small load. If it looks about half-full, it’s a medium load, and if it’s close to full, it’s a full load. Do not overload your washer—cramming in too many clothes won’t allow the detergent to distribute evenly, which can cause wrinkled, less-than-clean clothes.

Finally, be careful when measuring out your laundry detergent. Using too much detergent won’t make your clothes cleaner—in fact, it will leave a residue on your clothes that can make them break down that much faster and too many suds will not allow an adequate amount of water to fill the machine.  This is due to a water level sensor. Also, detergents today tend to be much more concentrated than they were in the past, so be sure to carefully check the recommended amounts on the detergent packaging and double-check the cap’s measuring lines before you pour. 

Read More 6 Ways to Cut Down Energy Costs In The Summer

Laundry Symbols or Hieroglyphics?

As if life wasn’t confusing enough with emoji’s and acronyms – now we have to deal with squares, circles, triangles, lines and dots on the labels of our clothing! However, clothing-care symbols are a code worth knowing.

The American Society for Testing and Materials, ASTM International, put out a standardized set of care symbols with the goal of creating a universally understood “laundry language”.

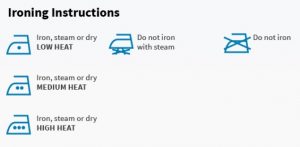
ASTM symbols follow a simple scheme and a set order: wash (tub shape), bleach (triangle), dry (square), iron (iron) and special care (circle). A circle by itself usually means dry cleaning or wet cleaning. A circle (special care) inside a square (drying) changes “dry” to “tumble dry.”

Adding lines, dots and other marks modify these base symbols and adds info. For example, a large X through a symbol offers a warning, where an empty symbol often means that any version of what the symbol represents is OK to use. A crossed-out triangle means do not bleach, where an empty triangle tells you that any bleach will do. Adding two parallel diagonal lines means to use only non-chlorine/oxygen bleach.

Clear as mud?  Don’t worry, I’ve included a chart to help you decipher what seem to be ancient Egyptian hieroglyphics:
 

Read More 6 Ways to Cut Down Energy Costs In The Summer

Laundry Myths Debunked

Some laundry tips are nothing more than old wives’ tales and are simply a waste of time and money. Below are a few laundry myths debunked with some real information you can use that will make laundry easier.


        Hair Spray To Remove Ink

The idea of using hair spray to remove ink from laundry began in the 50s and was actually a valid tip back then. It was the alcohol in hair spray that worked on the ink stain. However, today’s hair sprays are different from those aerosols of the 50’s. Today, most hair sprays don’t even contain alcohol and can actually cause stains themselves or set the ink in.

Begin by wetting a cotton swab with isopropyl or rubbing alcohol ( test the fabric to be sure the alcohol does not damage or discolor the material). Start by working from the outside of the stain to the inside, dab the spot with the swab. Change to a new swab as ink is absorbed to keep from redistributing the ink.

If traces of the ink remain, mix a solution of oxygen-based bleach (OxiClean, Clorox 2, Purex 2 Color Safe Bleach) and cool water. Follow the package directions as to how much product per gallon of water. Completely submerge the garment and allow it to soak for at least eight hours, then check the stain.

If it’s gone, wash as usual as directed on the label. If it remains, mix a fresh solution and repeat. It may take several soakings to remove the stain but it should come out.


        More Detergent = Cleaner Clothes

More is not better when it comes to laundry detergent.  Most of us, at some time or another, are guilty of using too much detergent.  This creates excess suds that actually redeposit soil onto our clothing.

We recommend using half as much detergent as recommended and see if you are pleased with the results. You can always add more but you can’t take it out. Most detergents these days are highly concentrated and don’t require as much as in the past.


        Hot Water Kills All Laundry Germs

Unfortunately, using hot water alone for laundry does not kill all germs and bacteria. Washing clothing or linens of someone who is ill can spread the germs throughout the entire washer whether you use hot or cold water. Only a disinfectant like bleach, pine oil or a phenolic disinfectant (Lysol) will sanitize the laundry and the washer.


        The Sock Monster

Most missing socks are not eaten by a monster in your washer or dryer or even trapped in the machine. (You would know if a sock got into the motor of either one pretty quickly.)

Most socks disappear between leaving the foot and the clothes hamper or the clothes hamper and the machine. Check behind your washer and dryer for a stash of socks that have fallen, or check the inside of pant legs for those secret clingers due to static.

Keep a basket or bin or mesh bag in the laundry room or near your clothes hamper for all those extra socks. Once a month go through and sort and match or just buy one kind of sock so they all match!


Read More 6 Ways to Cut Down Energy Costs In The Summer
bottom Gears Mobile bottom Gears