header image

Blog

Understanding Laundry Language

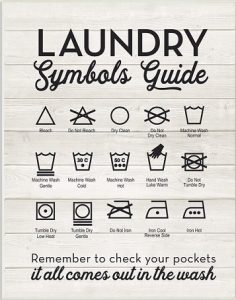
As if life wasn’t confusing enough with emoji’s and acronyms – now we have to deal with squares, circles, triangles, lines and dots on the labels of our clothing! However, clothing-care symbols are a code worth knowing.

The American Society for Testing and Materials, ASTM International, put out a standardized set of care symbols with the goal of creating a universally understood “laundry language”.

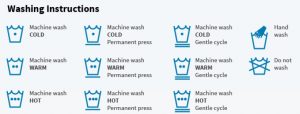
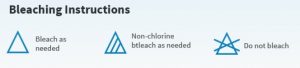
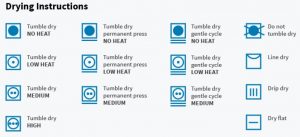
ASTM symbols follow a simple scheme and a set order: wash (tub shape), bleach (triangle), dry (square), iron (iron) and special care (circle). A circle by itself usually means dry cleaning or wet cleaning. A circle (special care) inside a square (drying) changes “dry” to “tumble dry.”

Adding lines, dots and other marks modify these base symbols and adds info. For example, a large X through a symbol offers a warning, where an empty symbol often means that any version of what the symbol represents is OK to use. A crossed-out triangle means do not bleach, where an empty triangle tells you that any bleach will do. Adding two parallel diagonal lines means to use only non-chlorine/oxygen bleach.

Clear as mud?  Don’t worry, I’ve included a chart to help you decipher what seem to be ancient Egyptian hieroglyphics:

Read More “6 Ways to Cut Down Energy Costs In The Summer”

Fabric Softener Myths

Are you perplexed as to which fabric softener you should use? Both fabric softeners and dryer sheets do make your clothes feel softer and smell better, and they do reduce wrinkles too — especially if you line dry your clothes. However, there are a number of misconceptions about these 2 popular laundry aids.  Below are a few of the more popular myths.

Myth #1:  fabric softeners and dryer sheets shouldn’t be used with microfiber towels.

This is true.

Liquid fabric softeners as well as dryer sheets will significantly damage the fibers in microfiber. Microfiber towels should not be subjected to heat at all. Not only are dryer sheets a problem, but the heat itself can wreak havoc on your microfiber towels. If you must dry them quickly, then choose a low- or no-heat option.

Myth #2:  Fabric softener and dryer sheets shouldn’t be used with athletic sportswear, spandex & nylon garments.

This is true.

Fabric softener can reduce the ability of certain fabrics to manage moisture and breathe — including sportswear, swimsuits, undergarments, and athletic wear with wicking properties intended to keep you dry and cool.

The waxy softening agents in fabric softeners interfere with the garment’s ability to wick away moisture to keep you cool & dry, so you should avoid using softeners with most sportswear.

Myth #3: Fabric softeners won’t stain your clothes.

This is false.

Most fabric softeners state right on the bottle that you shouldn’t pour fabric softener directly on your clothes. When liquid fabric softener is used on certain fabrics (or fabric blends), oily looking spots or discoloration can result. A fabric softener stain looks blue-gray and greasy.

Both fabric softeners and dryer sheets help eliminate static and wrinkles while making clothes feel softer and smell better. Keep in mind that if you are not using a dispenser or a softener ball, make sure to add liquid softener during the final rinse when the tub is full of water to avoid staining.

Myth #4: Fabric softener is always necessary

This is false.

Fabric softener is sometimes necessary but not always. It does make your clothes, bedding and towels soft and fluffy, but adding softener can become problematic for certain items such as towels. The softer the product, the less it will absorb. The more fabric softener you use on your towels, the less absorbent they’ll become.


Read More “6 Ways to Cut Down Energy Costs In The Summer”

Removing Smoke Odor On Clothes

We all know that smell. The one that lingers after a night out, dinner around a camp fire or an evening spent at a concert. That lingering odor that follows you home. How do you get that annoying smoke odor out of your clothes?

WITHOUT WASHING:

Air it Out

The first thing a smoky garment needs is some fresh air.  Hang the garments in a well ventilated area…even better hang outside.  It’s amazing what a little sun and fresh air can do.

Odor Eliminating Spray or Essential Oils

If the smoke smell remains, keep the garments hanging and use an odor eliminating such as Febreze all over the front and back.  You can make your own odor eliminating spray by combining equal parts vinegar and water in a spray bottle.  Add 20-30 drops of your favorite essential oil such as lemon or mint oil.

Baking Soda

Place garment in an extra large plastic zipper bag with plenty of room for the garment to move around.  If you don’t have a large enough zipper bag – use a plastic shopping bag or garbage bag. Add ½ cup of baking soda, seal or tie the bag securely, give it a quick shake and let the entire thing sit overnight.  That will give the baking soda time to absorb the odor.  Once it’s done sitting, take the bag outside, open and shake off excess baking soda. Tumble garment in low or no heat drying cycle to help.

IN THE WASHING MACHINE:

Vinegar Pre-Soak

Before washing, give your garment a nice, long, soak.  Add 1 cup vinegar to a sink or tub, then fill with warm water. Add a few drops of your favorite essential oil for a fresh scent.  Soak garment for 30-60 minutes, then wash as directed.

Scent Booster

I’ve tried  Downy Unstopables and love what they do.  Just add a scoop to a load of smoky-smelling clothes and let them go to work.

Lemon Juice

Fresh lemon juice can do wonders for all kinds of cleaning purposes, especially in the laundry room.  Whiten whites and remove all sorts of odors, such as smoke, just by adding ½ a cup of lemon juice to the wash.

Vodka

Alcohol is a powerful odor remover and safe on most washable fabrics.  Pour ½ cup of cheap vodka (or rubbing alcohol) into the wash to eliminate tough odors.


Read More “6 Ways to Cut Down Energy Costs In The Summer”

When Times Are Tough…Cut Cost…Make Your Own Detergent

What you will need:

3/4 Cup Dawn dish liquid (blue)

3/4 Cup washing soda

3/4 Cup Borax powder

Hot water

One Gallon container

Measure out the washing soda and pour into the gallon container.  Then,  the Borax.  Get about 3 Cups of hot  tap water and add to the washing soda and Borax mixture.   Be sure to screw the lid on tight and shake.  Pour more water into the container until almost full and add the blue Dawn dish liquid.  Finish filling container with water.  Secure the lid again. Roll the container to mix – DON’T SHAKE! The soap will bubble if you disturb it too much.  Use 1/4 Cup in your laundry like any other detergent.

https://clark.com/family-lifestyle/diy-laundry-detergent-save-money/

Read More “6 Ways to Cut Down Energy Costs In The Summer”

How to Clean Laundry Exposed to Covid-19 (Coronavirus)

We’ve all heard how important it is to wash our hands and clean surfaces that come in contact with Covid-19 (Coronavirus) but what about our clothes, linens and towels that we deal with daily? It’s imperative that we remember to clean those items as well and clean them correctly. Below are the proper steps to cleaning those items – according to the CDC guidelines – https://www.cdc.gov/coronavirus/2019-ncov/prepare/cleaning-disinfection.html

Clothing, Towels, Linens and Other Items

  • Wear disposable gloves when handling dirty laundry from an ill person and then discard after each use. If using reusable gloves, those gloves should be dedicated for cleaning and disinfection of surfaces for COVID-19 and should not be used for other household purposes.  Clean hands immediately after gloves are removed.


  • If no gloves are used when handling dirty laundry, be sure to wash hands afterwards.


  • If possible, do not shake dirty laundry. This will minimize the possibility of dispersing the virus through the air.


  • Launder items as appropriate in accordance with the manufacturer’s instructions. If possible, launder items using the warmest appropriate water setting for the items and dry items completely. Dirty laundry from an ill person can be washed with other people’s items.


  • Clean and disinfect clothes hampers. If possible, consider placing a bag liner that is either disposable (can be thrown away) or can be laundered.

Read More “6 Ways to Cut Down Energy Costs In The Summer”

The Importance of Sorting Clothes

Interestingly enough, you’ll find several different opinions when it comes to sorting your laundry.  Our method is certainly not the only way.  If you have a method that works for you, then by all means keep doing it!  But if you’re getting worn out, torn or discolored clothes, then this article is for you.

What’s the reason to sort clothes in the first place? Do you really need to sort clothes at all?  In our opinion, you do.  Sorting clothes allows you to use different wash cycles (delicate, normal, permanent press) and also allows for washing in different temperatures.

Most importantly, sorting clothes decreases the chances that a garment is going to bleed onto another when you control the cycle type and water temperature.

Sorting Clothes by Color

There are several distinct piles in which to sort clothes: whites, darks, lights, jeans, and delicates.

∙Whites:  T-shirts, underwear, socks and other similar items fall into this category.  This pile is for white sturdy cottons that can withstand normal agitation in the washer on a warm or hot wash cycle.

∙Darks: Grays, blacks, navies, reds, dark purples and similar colors are sorted into this load.

∙Lights: More pastel-type colors such as pinks, lavenders, light blues, lights greens and yellows are placed in this pile of laundry.

∙Jeans: All items with denim material are washed together in this load.

∙Delicates: This category includes several types of clothing – lingerie, washable silks, and any clothing you’d like to keep from the harsh agitation of the washer.

Sorting Clothes by Fabric Weight

Please note that color is not the only consideration when sorting clothes. The weight of the garment should be considered as well.

For example, if you have several pairs of heavy cotton pants, or denim, then you don’t want to wash those with thin t-shirts.  Washing light- weight clothes with heavy material can possibly tear or rip those garments.

If they are placed in the dryer together, they obviously won’t dry at the same rate since one fabric is much heavier than the other.

It’s best just to separate these types of garments from the start and wash them in two separate loads.

Read More “6 Ways to Cut Down Energy Costs In The Summer”

Microfiber 101

Washing and drying microfiber towels properly ensures towels will last longer, stay softer, and produce better results when trying to clean your windows, appliances, drying off your vehicle after washing, or using them for waxing your vehicle.

Step 1: Separate Your Towels

Before washing your microfiber, separate your towels into specific groups such as windows, appliances, vehicles, wheels, etc. Washing your towels in separate groups reduces the chance of cross-contamination during the washing process. If you wash your waxing towels and your window cleaning towels in the same load, wax residue can become embedded in the window towels and can cause streaks when cleaning glass, or appliances such as stainless steel.

Step 2: Use Proper Microfiber Wash

Choosing the correct microfiber wash solution is important to maintaining the condition of your microfiber. Using generic laundry detergent can reduce the life and performance of microfiber towels. We recommend only using a microfiber specific washing solution, such as Chemical Guys Microfiber Wash, to achieve the best results when washing your towels and microfiber goods. Microfiber Wash is designed to safely remove dirt and contamination from your microfiber without harming the material. Using generic laundry detergent can make microfiber feel stiff and rough. DO NOT USE FABRIC SOFTENER! Fabric softener clogs the fiber material and reduces microfiber performance. Fabric softener blocks liquids from being absorbed by the microfiber material.

Step 3: Use the Correct Wash Settings

Place your microfiber towels in the washing machine. Select “Hot” for the water temperature. Washing microfiber with hot water opens the fibers to release dirt and contamination. Add 1 oz. to 4 oz. (depending on load size) of Microfiber Wash to the machine. Press start and allow the machine to do the work.

Step 4: Drying the Microfiber

Now that the towels are washed, it’s time to dry. Machine drying is recommended to ensure the towels are clean, fluffy, and ready to detail. Place all your microfiber goods in the dryer, and set the temperature to “low”. Do not dry microfiber goods on high heat. Using high heat on microfiber can fry the polyester in the microfiber, causing the towel to feel stiff and hard. Towels that are dried on high heat can lead to scratches and swirls when used on cars, appliances or windows.

Step 5: Fold and Store

Once the towels are dry, properly fold and store them. Microfiber can easily hold dirt and dust. To ensure the towels stay clean, store the them in a clean cabinet, closet or container. Storing the towels properly can ensure that no dirt, dust, or debris lands on your towels.


Read More “6 Ways to Cut Down Energy Costs In The Summer”

Choosing the Correct Water Temperature

Most people think the way to get the job done is to wash everything in a single load with cold water. That way, you get it all done at once, and there’s no color transfer between clothes, but that’s not always the case.  Washing everything together in cold will prevent color transfer, but unfortunately it won’t get everything clean.


When to wash in hot water

Hot wash works well on ground-in and hard-to-remove dirt on sturdy fabrics.

Generally speaking, you should wash white clothes in hot water. Washing colors in hot water is also recommended if the clothes are really dirty or greasy, and they’re made of sturdy, color-fast fabric. (Wash them separately, of course.)

Use it to clean seriously soiled sturdy garments (gardening or children’s clothing), and to regularly disinfect dish towels, washcloths, bath towels, bedding, and pillowcases.

Light and dark fabrics should be separated as hot water may cause these clothes to bleed.

Delicate and coarse or sturdy fabrics should be separated to prevent abrasion and protect clothes from wear and tear.


When to wash in warm water

Warm water (or permanent press wash setting) minimizes color fading and wrinkling. Wash light clothes, as well as regular and sturdy fabrics, towels, jeans, 100 percent manmade fibers, and blends of natural and manmade fibers. It’s also appropriate for moderately dirty clothes that don’t need the extra power of a hot water temperature wash.


When to wash in cold water

Washing clothes with cold water will protect most dark or bright-colored clothing from running and minimizes shrinkage. Use the cold wash cycle for lightly soiled fabrics and clothes with blood, wine or coffee stains, dark or bright colors that may run or fade, delicate fabrics including washable silk, Spandex swimsuits, and active wear; and delicate lingerie. It’s also okay for lightly soiled clothes.

There’s a misconception that washing clothes in cold water won’t get clothes clean. This is because detergent is formulated for, and fully activated in, warm water. Cooler water won’t fully activate detergent, which means you’ll need to use more to make up for the temperature difference to get your cold wash clothes clean. Thankfully there are several brands of detergent that are designed to work in all temperatures. Tide, Arm & Hammer, All, and Wisk are just a few that we recommend.

Read More “6 Ways to Cut Down Energy Costs In The Summer”

How To Get Mildew Smell Out of Towels

At some point most of us have used a towel, for whatever reason, and tossed it in to the dirty laundry and forgotten it was wet. A few days later and the smell will remind you! That smell is caused by mildew that sets in, and isn’t very easy to get rid of.  Washing your towels a few times on a normal setting may get rid of the odor, but if that isn’t enough to combat the mildew smell, I’ve found a way to get your towels back in shape and get that unpleasant smell out quickly. Here is how:

  1. Place your smelly towels in the washing machine and fill with the hottest water possible. Add in 2 cups of white vinegar and let them soak for at least 30 mins. Do not add any other products (detergent, softener etc.). This will allow the vinegar to penetrate the material without interference.
  2. Run a full cycle after your towels have soaked in the vinegar water. Leaving the towels in the washer repeat step 1, only this time use baking soda instead of vinegar. Run a full cycle once again.
  3. Dry the towels on hottest setting possible until they are fully dry.


Read More “6 Ways to Cut Down Energy Costs In The Summer”

Removing Yellow Stains

Stains occur when the aluminum in your antiperspirant or deodorant combines with the salt in your sweat. The stains are notoriously difficult to get rid of with normal washing in the laundry machine.  According to  We recommend doing a pre-test on a small area before trying.

Here’s what you need:

  • 3% hydrogen peroxide
  • Dish soap
  • Baking soda
  • Toothbrush

Apply the ingredients directly to the shirt, use an old toothbrush to work them in for a minute, and then let the shirt sit for at least an hour before putting it in the washing machine.  To prevent the stains in the first place, Degree deodorant says it helps to wear loose clothing, make sure your antiperspirant deodorant is dry before you get dressed and don’t use too much product.


Read More “6 Ways to Cut Down Energy Costs In The Summer”
bottom Gears Mobile bottom Gears