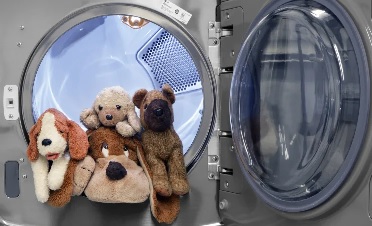
How To Properly Wash Your Kids Stuffed Toys

Did you know it’s perfectly safe to throw most stuffed toys in the washing machine? On gentle cycle using warm or cold water, a washing machine will get your stuffed animals clean without ruining them.

Most care labels instruct to hand wash, but after raising two kids and needing to deep clean their beloved friends, I tried machine washing.  Set the washing machine  to the delicate cycle, apply  some Spray N’ Wash, Mean Green, or your choice of stain remover if needed,  scrub a little, and wash. Afterwards hang them up to dry. I learned the hard way that throwing them in the dryer can melt the fake fur on some of them.  Poor Simba from the Lion King had a melted mane!

SOME THINGS TO CONSIDER WHEN DECIDING IF YOUR STUFFED ANIMALS CAN BE WASHED IN THE WASHING MACHINE:

  • The care label – if it can be hand washed, it can likely withstand the delicate cycle in the washing machine. Your washing machine may even have a hand wash cycle.
  • Material – Take notice of the care label and use your sense of touch as well as sight to thoroughly examine all parts of the stuffed animal to be washed. Polyester and acetate (a form of cotton) are fine to wash. The stuffed animals I washed have plastic pellets and were fine, but you wouldn’t want to machine wash something with foam balls such as Beanie Babies. Be cautious of delicate clothing items and things that are glued on, they may not survive!
  • Age – The older it is, the more fragile it will be!

Read More 6 Ways to Cut Down Energy Costs In The Summer

Removing Diesel/Gas Stains and Odors

Have you ever been pumping gas and all of a sudden the tank is full and Ooops! the gas splashes out and right on to your clothes? So how do you get that awful odor out? It’s important to know that diesel/gas stains make all fabrics more flammable than normal so it is very important to handle the items carefully.

IMPORTANT NOTE: Gas and diesel stained clothes and rags should not be washed with other clothing. If after washing you can still smell fuel odor, do not place the garments in a clothes dryer. The excessive heat can cause the fabric to burst into flames.

Since gasoline and diesel are petroleum oil-based stains, they need to be pretreated using a solvent based stain removal product, like Shout or Spray ‘n Wash. If you don’t have a solvent-based pre-treater, apply a bit of enzyme-based heavy-duty liquid detergent, like Tide or Persil to the stain and work it in by gently rubbing with a soft bristle brush. Allow the stain remover to work for at least fifteen minutes before washing.

After pretreatment, wash the garment as usual in the hottest water appropriate for the fabric. Inspect the garment for stains and sniff for odors before drying and repeat treatment if necessary.

If there is still any lingering fuel odors, soak the stained clothes overnight in enough water to completely submerge the fabric with 1 cup baking soda added. Then rewash and rinse as usual.

For exceptionally heavy odors, fill the washer, deep sink or plastic tub with warm water and add 1 cup household ammonia. Shut the lid or cover the solution if possible. Allow the garments to soak for several hours or overnight. Drain the washer and wash as usual.

DO NOT USE ANY CHLORINE BLEACH during the soaking or washing because dangerous fumes can form.

Allowing the clothes to air dry outside will help remove odors as well. Again, if any trace of odor remains, air dry on an indoor rack or outside on a clothesline. Do not put these items in an electric or gas dryer.

Read More 6 Ways to Cut Down Energy Costs In The Summer

How to Get Cleaner, Brighter, Clothes


Why buy expensive or dangerous cleaning products, bleaches or de-greasers when all you need is probably already in your cabinet!

Did you know baking soda can work magic — including getting cleaner and brighter  whites at a fraction of the cost.

It’s as easy as 1, 2, 3…..

1) Put one cup of baking soda in your wash.

2) Then add your detergent

3) Run your wash on the normal setting and……Voila!  Brighter, cleaner whites!

Try this DIY homemade laundry detergent recipe. This is a project that will save you money and help you rid your home of toxic chemical cleaners and make your clothes brighter and cleaner in the process.

Ingredients

  • 1 bar (or 4.5 ounces) shaved bar soap (a homemade laundry bar, Ivory, or Zote)
  • 1 cup Borax
  • 1 cup baking soda

Directions

Thoroughly mix all ingredients together. Use 1 Tbsp per small load (or 2-3 Tbsp for large or heavily soiled loads) then add  to your laundry.  Store remaining in a sealed container.

Keeping your colors brighter is a challenge at times. Colors fade when the chemical bonds between the dye and the fabric break down, so the best way to keep your colors bright is to wash clothes in a way that either prevents dyes from dissolving, protects the fibers in the fabric — or both. Follow these tips, and your colors will look as good as new!

  • Turn clothes inside out— According to experts, the tumbling action of the wash cycle and the dryer can cause fabric fibers to break as clothes collide into each other and against the walls of the machine. Turning clothes inside out before you wash them will keep the worst of the fraying on the inside.
  • Soak clothes in salt water— Salt is inexpensive, environmentally friendly and great for keeping your colors bright. Before you wash that colorful new top, soak it overnight in salt water. Simply fill your washer with cold water, add 1/4 to 1/2 cup of salt, and then add your clothes. In the morning, just add detergent and run the washer as you normally would. You can add additional clothes at this point, too — just be sure not to overfill the washer.
  • Wash in cold water— Washing in cold water instead of hot not only helps keep your colors bright, it also conserves energy and saves you money. For best results, use a detergent formulated for bright clothes and cold-water washing.

Read More 6 Ways to Cut Down Energy Costs In The Summer

Removing Wrinkles from Permanent Press Clothing

I do not like to iron! I want to pick out an outfit, put it on, and then be on my way.  I do not want to pick out an outfit, get the iron and ironing board out, and then iron it. It takes more time out of my schedule if I have to iron, and if you’re in a rush, it can be stressful! Here are a few of my ”tried and true” tips to help you out.

Be sure to dry permanent press clothing in a gentle/low heat dryer, not HOT!  Hot will only make a wrinkled mess and can melt the fabric. If you forget your clothes and don’t pull them out of the dryer in time, and they happened to get wrinkled, all you have to do is place a damp bath towel in with your clothes on gentle/low heat and dry for a few more minutes. Be sure to take them out just before or as soon as they are dry and lay flat or hang on a hanger.

After you’ve washed and dried your clothes, remove them immediately from the dryer. Then with a little spray bottle filled with water, spray the collar, button hole placard, and the sleeve edges. Then quickly “Finger Press” those focal points to be smooth and flat so they are no longer folded, curled, or crinkly. This easy finishing touch makes a big difference for permanent press shirts to look so much nicer….and it’s easy! No Iron involved!

If you do end up needing to get the dreaded iron out, then try to iron your clothes with a damp cloth. Place the damp cloth on top of the garment and iron. This will steam the fabric and it won’t be too hot. Try a small spot first to see if this will work on the fabric. Remember, too hot of a dryer or iron on permanent press fabric can melt it.

Read More 6 Ways to Cut Down Energy Costs In The Summer
bottom Gears Mobile bottom Gears