Removing Stubborn Creases

Do your clothes develop stubborn creases that seem impossible to iron out? Fortunately there are ways to get rid of unwanted, stubborn creases and it’s not too hard to do it.

We always start by washing the garment first. This should loosen it up a bit. After you wash, then begin the ironing.  Spray starch heavily on the crease, then move the iron slowly, continuing to press the iron into the crease. In most cases this should do the trick for getting out that stubborn crease.

If washing and ironing don’t work however, you do have a couple of options. You can remove the crease mark by rubbing a bar of soap along the line on the inside before pressing. Also you can pursue the vinegar method. Combine equal parts of vinegar and water and spray as you press out the crease. This will probably make your clothes smell a little funny so you’ll probably want to wash the garment again before wearing. (The extra wash should also help with getting that crease out).

Another tip you can try is taking a mixture of two parts hair conditioner and one part water and rubbing that on the crease. With both of the latter techniques you will want to test it in an inconspicuous part of the item or on a completely different item all together. Make sure it’s conducive to your garments before trying.

Creases don’t have to be the end-all-be-all to your clothes. You can beat those creases if you follow these simple pieces of advice.


Read More “6 Ways to Cut Down Energy Costs In The Summer”

Brassiere Washing

Although bras don’t necessarily fall in the “wash after every use” category, like underwear and socks, they do require more maintenance than you might be currently giving them.

“Rule of Three”

They should be washed every three wears rather than every three days. It’s a good idea to have one to wash, one to wear and one to store and swap out.

The reason you should have multiple bras to swap out is because the fibers in the elastics don’t have a chance to rebound and go back to where they were. In a matter of days, you’ll find the back of your bra hiking, because those elastics have already stretched.

Washing

Ideally, bras should be hand washed in warm water, using a delicate detergent. Gently rub until it’s clean, make sure it’s thoroughly rinsed and hang or lay flat to dry.

If you’re rushed for time, use your machine on the gentle/delicate cycle  and use a gentle detergent. Be sure to secure the hook and eye because a lot of time that hook and eye can snag the lace or fabric.

Thankfully, newer washing machines, which don’t have agitators, are much gentler on bras. But even so, placing your bra in a lingerie bag before putting it in the machine is best. Lingerie bags prevent warping of underwire bras, fraying and excessive stress on the elastic waist.

Drying

Never put your bra in the dryer. Heat can cause your bra to shrink and that will impact the fit and comfort. A well-made bra should last up to five years if it is hand-washed and air-dried.

Read More “6 Ways to Cut Down Energy Costs In The Summer”

Decoding Laundry Symbols

As if life wasn’t confusing enough with emoji’s and acronyms – now we have to deal with squares, circles, triangles, lines and dots on the labels of our clothing! However, clothing-care symbols are a code worth knowing.

The American Society for Testing and Materials, ASTM International, put out a standardized set of care symbols with the goal of creating a universally understood “laundry language”.

ASTM symbols follow a simple scheme and a set order: wash (tub shape), bleach (triangle), dry (square), iron (iron) and special care (circle). A circle by itself usually means dry cleaning or wet cleaning. A circle (special care) inside a square (drying) changes “dry” to “tumble dry.”

Adding lines, dots and other marks modify these base symbols and adds info. For example, a large X through a symbol offers a warning, where an empty symbol often means that any version of what the symbol represents is OK to use. A crossed-out triangle means do not bleach, where an empty triangle tells you that any bleach will do. Adding two parallel diagonal lines means to use only non-chlorine/oxygen bleach.

Clear as mud?  Don’t worry, I’ve included a chart to help you decipher what seem to be ancient Egyptian hieroglyphics:

Read More “6 Ways to Cut Down Energy Costs In The Summer”

When To Skip The Fabric Softener

Fabric softeners and dryer sheets make our clothes and linens feel soft and fluffy, smell great and remove static, but did you know there are certain types of fabric that should NEVER have fabric softeners? Before you wash, please read. I’ll list some effective alternatives below as well.

Athletic Wear

Most workout clothes are designed to wick moisture away from your body and dry quickly. Fabric softeners and dryers sheets leave a coating behind, that cause moisture to become locked into the fabric and keep it from drying. This leads to permanent odor from the bacteria locked in the fabric. Wash these garments in a cold, gentle cycle and air dry.

Microfiber Cloths

Microfiber is relatively durable, but it becomes pretty useless when the fibers absorb the waxy residue that fabric softeners and dryer sheets leave behind. It’s tempting to use because microfiber is notorious for static cling when it comes out of the dryer. Instead, try tossing a ball of aluminum foil in the dryer with microfiber items to release the static charge.

Children’s Sleepwear

 Most infant and child sleepwear is designed to be fire resistant for safety reasons. Wax from fabric softener residue can cause the fabric to lose its fire-resistance quality and can make it highly flammable. Instead of using fabric softener or a dryer sheet, add vinegar to the rinse cycle in the washer. It will soften the fabric and reduce static cling. For those extra static clingy PJs, do the vinegar rinse in the washer AND add a foil ball in the dryer.

Alternatives

Soften and reduce static cling with these gentle, fabric-friendly options:

Vinegar Rinse

Add ½ cup distilled white vinegar into your washer’s softener dispenser (or use a Downy ball). The smell will disappear in the dryer.

Wool Dryer Balls

You can find wool dryer balls on Amazon for about the same price as a couple of bottles of fabric softener except these will last A LOT longer. Toss 5-6 into the dryer to soften a load of clothes. They’ll also help larger loads dry more quickly and evenly.

Aluminum Foil

Grab the Aluminum foil from the cabinet, pull a 12”-18” sheet and crush it into a ball. Toss one into the dryer to reduce static. The ball will shrink and tighten as it’s used. Replace once the edges begin to crack or pull apart.

Read More “6 Ways to Cut Down Energy Costs In The Summer”

Removing Make-Up Stains

Removing cosmetics from clothing can be a chore. Knowing the most efficient methods for removing makeup stains can save you a lot of time, money, and frustration.

First of all, know the type of  makeup you’re dealing with: non-oily or oily. Non-oily are powder products like eye shadows and blushes. Oily types are lipsticks, cream blushes, and other liquid makeup. Each type requires a specific method of removal. So…..determine if your makeup stain is non-oily or oily.

Second, you should attempt to remove the stain as quickly as possible to avoid letting them set into your garments. Fresh stains come out a lot easier than when they’re left.

Lipstick

Lipstick is oil-based, and should be treated with a pre-wash stain remover before attempting to wash it out. Never rub the stain, as it only causes the lipstick to go deeper into the fabric. We recommend blotting the stain with a clean white cloth, and rinse the stained material in warm water (you want to use a white cloth to avoid any fabric dyes from transferring to the stain).  If the stain persist, apply a good liquid household detergent to the stain, but don’t rub, blot.

Rubbing alcohol will also remove lipstick stains. Again, using a white cloth, dab the stain with a small amount of isopropyl alcohol, then add a small amount of household detergent and wash the garment per the label instructions.

Liquid Makeup

Removing liquid makeup stains can be a battle. Try using Dawn dish soap as a removal agent. Liquid makeup is oil based, and we all know Dawn helps cut through grease.  Then add a small amount of household detergent and wash the garment per the label instructions.

Powder Blush or Eye Shadows

The first thing when you have a powder spill is to try and blow it off the garment. Sometimes that will be enough to get most of it off before laundering per your normal routine. Once you’ve done that, remaining makeup can be wiped off using a damp washcloth and a tiny amount of liquid soap.

Tip:

Be sure to read the care label on any garments before attempting to remove the stain. You may find the garment is “dry clean only” or discover other specifications that will determine your choice of stain removal.

Read More “6 Ways to Cut Down Energy Costs In The Summer”

Caring for Denim

Chances are you bought those new jeans or that denim jacket because you liked the color and texture of the denim, right? Well, those new jeans and denim jackets have been dyed to get that color and rough-and-tumble look to last through multiple washing’s.

To keep jeans looking good, you’ll need to launder your denim carefully to keep the look you love.

1. Always wash new jeans separately.

Dark wash jeans should be washed separately the first time, and in a laundry detergent designed to keep their dark colors safe and intact. The dye in most jeans transfers readily during the laundry cycle, so it’s important to bathe them all by themselves.

2. Turn jeans inside-out before washing.

Washed jeans should be laundered inside-out in warm or cool water to prevent fading (unless you want fading, of course.) Keep both new and washed jeans away from laundry detergents with bleach for the same reason. This is one time you’ll want to use a basic laundry detergent without additives or boosters.

3. Avoid frequent tumble drying and dry cleaning.

Avoid frequent tumble-drying and dry cleaning. Heat may damages fibers, and dry cleaning may cause discoloration. When necessary, tumble dry while the dryer is cool and use the delicate setting.

To extend the lifespan of jeans, lay them flat to dry whenever possible instead of tossing them into the dryer.

4. Don’t spot clean jeans.

Don’t try to spot-clean denim. Instead, wash the entire pants so you don’t create a faded area where the spot or spill was.

5. If needed, iron jeans while damp.

This step is very easy and for those who like the crisp, pressed look. To put it simply – iron the denim while it’s still damp on the highest setting recommended for denim on your iron. Another option is to bring your jean in to us at Sapulpa Laundry. We will get your jeans crisp and pressed with a crease or not, and starched or not – however you prefer.

Read More “6 Ways to Cut Down Energy Costs In The Summer”

Back To School Time: Kids and Laundry

We believe it’s important to teach your kids how to help with their laundry.  It makes life a little easier on Mom, Dad, Grandma, other family members, and makes your kid’s responsible for their belongings. Here are some simple steps to get you started.

GIVE YOUR KIDS THEIR OWN LAUNDRY BASKET

You can find kid sized laundry baskets at Target, or Wal-Mart that are just the perfect size for one load of laundry.

The same basket can be used to carry laundry to the washing machine, carrying the clean laundry from the dryer to wherever it’s folded, and if needed, carrying the folded laundry to the dresser to be put away. Plastic baskets are easy to wipe out regularly and keep clean. When your kids get bigger and have bigger clothes, just upgrade them to a bigger basket.

The most important tip is reinforcing the habit of putting dirty clothes IN the basket, and then washing clothes when the basket gets full instead of continuing to heap clothes on top!

HAVE SET LAUNDRY DAYS

Depending on the number of kids you have, set one laundry day, give each kid their own day, or assign multiple kids per day.  Reinforce the laundry day habit by marking it on the calendar, adding it to your chore chart or maybe even an app on your phone! One week’s worth of laundry isn’t more than they can manage in one day, so it won’t be overwhelming to them.

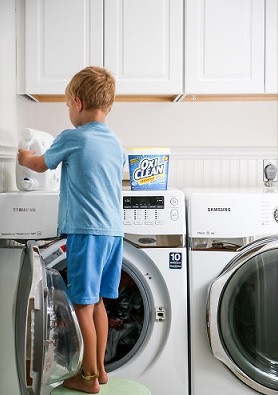
TEACH YOUR KIDS TO DO THEIR OWN LAUNDRY

Teaching the kids to do their own laundry is probably the scariest part – but also the most liberating!

ADJUST FOR AGE

Grow your kids into these healthy laundry habits, start when they are young and eager to help and add responsibility as they grow.

Children from 2-5 can learn to put clothes in the hamper when they take them off, help load things into the washing machine, help switch over to the dryer (hand them to the child to put into the dryer), and can help put folded items in drawers.

Children from 5-7 can “fold” and put away their own clothes and load the washer and dryer with supervision at first and then increasing independence.

Children ages 8 and up can pretty much do their own laundry from start to finish. They can also assist younger siblings with the washer and dryer settings!

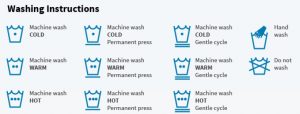
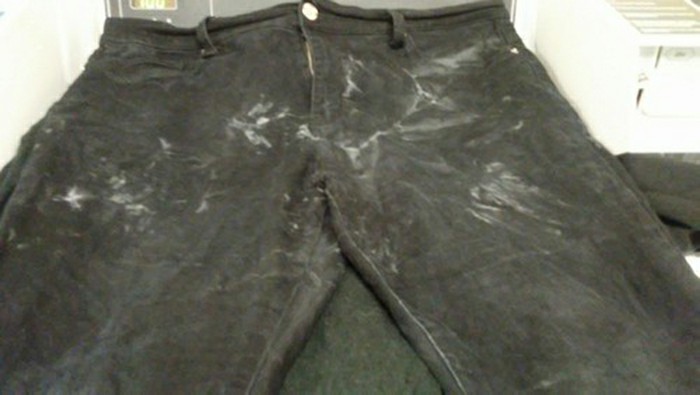
When my kids were little I realized that since we wash our clothes with cold water anyway, their clothes were small, and most of their wardrobe was the same color — all of their laundry could be washed together! If you want to bleach their socks or teach them to sort into lights and darks, you can do that, too, but I skipped it. Focus on checking pockets, setting aside items with stains or brand new items that haven’t been washed yet, the settings for the machines and soap, and checking the lint trap.  Observe at first and give them more freedom and independence as they get the hang of it.

TEACH YOUR KIDS TO FOLD (OR NOT)

Depending on their age, I believe the bigger goal is to have them get their clothes IN the dresser, get the drawers closed, and be able to find something to wear. I’ve learned that most kids aren’t concerned about folding but as they grow, they begin to fold their clothes on their own – especially when they see everyone else doing it. As kids grow, folding becomes more important if you want everything to fit in the drawers and not be a wrinkled mess.  At that point you will have to step in to teach them that folded clothes fit better, and look better.  They won’t like the idea of ironing!

“Important tip” here is to choose your battles, and focus on your main goal of teaching them to be responsible for their own laundry. The precision will come with time.

SOLVE YOUR SOCK ISSUES

Here’s another crazy idea – stop matching socks! Why stress yourself out? Solve your sock issues with three simple steps. First, buy all one kind of sock, and second, buy different brands (different colored toes, etc.) for each kid. They will have some other socks of course – maybe some church socks, maybe some Christmas socks but the bulk of their daily socks will be the same. Third step – skip the “folding” and assign a drawer or basket in a drawer for socks. It keeps all the socks together, and it skips the hassle of matching and folding.

All of these habits work together to create an easy laundry system your kids can help with. By having their own basket, they are responsible for their own laundry. By having laundry days and small baskets you are limiting the amount of laundry they have to wash at one time. By foregoing sorting, sock matching and folding, you’re preventing your children from becoming overwhelmed with the details of perfection and focusing instead on being responsible and the joy of independence.


Read More “6 Ways to Cut Down Energy Costs In The Summer”

Effective Grease Stain Removal

You probably already have some of these cleaning agents in your home, and a couple that might be worth bringing home.  Here’s how to take grease stains off clothes, step by step.

Dish Soap and Hot Water

Treat stained clothes the same way you would a sink full of greasy dishes – remove grease from the surface with dish-washing liquid.  Dish detergent is designed to break up surface grease and allow it to rinse away.

  • Place the garment stain-side down on white paper towels. (Printed paper towels could transfer ink color to your clothes.)
  • Squirt a dime-size amount of dishwashing liquid on the backside of the grease stains. Gently rub the dish detergent into the stain center and work your way to the edges. Give it a minute or so to work its breakdown magic.
  • Rinse the treated area under warm to hot running water for a minute or so to remove the dish detergent. The water temperature will depend on what the fabric can handle. For 100 percent cotton, you can usually use hot water.
  • Follow the rinse with a spin in the washing machine, using the hottest water that’s safe for the fabric and your regular laundry detergent.  If you can’t read the clothing label care tab, choose a warm water wash.

Laundry Detergent Pre-treatment

Rub a liquid laundry detergent into the stain, and let sit for 3-5 minutes.

Wash the stained item separately from the rest of your clothes in the hottest recommended water, adding a little bleach or bleach alternative to the wash water. Extend the wash cycle to give the garment some extra time in the spin cycle.

Absorbent Powder

Another good tip that works on grease stains that are fresh is to use absorbent powder (such as cornstarch, salt, baking powder or talcum powder).

  • Apply the absorbent of choice, and let it set until the powder has absorbed as much of the grease stain as possible. Brush away the absorbent remnants with a stiff-bristle brush.

WD-40 and Dish Detergent

Place the garment on paper towels, grease stain side up. Spray the greasy area with WD-40. Let stand 10 minutes.

  • Turn the garment over and spray the underside  as well. Allow to sit another 10 minutes.
  • Using paper towels, blot on some hand dishwashing liquid, replacing the towels as they absorb the grease.
  • Rinse the treated area, and wash separately from the rest of your laundry.

Lestoil Heavy Duty Cleaner

Lestoil Heavy Duty Cleaner is made by Clorox. It safely removes oil spots, grease stains and tar from washable fabrics. It’s effective and easy to use, but it does have a very strong smell.

Simply pour Lestoil onto the greasy stain and let it soak in for about 20 minutes before washing. And if you’re washing a huge greasy load of laundry, add some to the wash water to get the load clean and grease-free.

Lestoil is also good for removing stains from fabric on sofas, chairs, carpets, and concrete driveways.

Last But Not Least

Inspect the treated area before drying to ensure the greasy stains are completely removed. If you can still see any residue, repeat the pre-treating and washing process until clear. 


You probably already have some of these cleaning agents in your home, and a couple that might be worth bringing home.  Here’s how to take grease stains off clothes, step by step.

Dish Soap and Hot Water

Treat stained clothes the same way you would a sink full of greasy dishes – remove grease from the surface with dish-washing liquid.  Dish detergent is designed to break up surface grease and allow it to rinse away.

  • Place the garment stain-side down on white paper towels. (Printed paper towels could transfer ink color to your clothes.)
  • Squirt a dime-size amount of dishwashing liquid on the backside of the grease stains. Gently rub the dish detergent into the stain center and work your way to the edges. Give it a minute or so to work its breakdown magic.
  • Rinse the treated area under warm to hot running water for a minute or so to remove the dish detergent. The water temperature will depend on what the fabric can handle. For 100 percent cotton, you can usually use hot water.
  • Follow the rinse with a spin in the washing machine, using the hottest water that’s safe for the fabric and your regular laundry detergent.  If you can’t read the clothing label care tab, choose a warm water wash.

Laundry Detergent Pre-treatment

Rub a liquid laundry detergent into the stain, and let sit for 3-5 minutes.

Wash the stained item separately from the rest of your clothes in the hottest recommended water, adding a little bleach or bleach alternative to the wash water. Extend the wash cycle to give the garment some extra time in the spin cycle.

Absorbent Powder

Another good tip that works on grease stains that are fresh is to use absorbent powder (such as cornstarch, salt, baking powder or talcum powder).

  • Apply the absorbent of choice, and let it set until the powder has absorbed as much of the grease stain as possible. Brush away the absorbent remnants with a stiff-bristle brush.

WD-40 and Dish Detergent

Place the garment on paper towels, grease stain side up. Spray the greasy area with WD-40. Let stand 10 minutes.

  • Turn the garment over and spray the underside  as well. Allow to sit another 10 minutes.
  • Using paper towels, blot on some hand dishwashing liquid, replacing the towels as they absorb the grease.
  • Rinse the treated area, and wash separately from the rest of your laundry.

Lestoil Heavy Duty Cleaner

Lestoil Heavy Duty Cleaner is made by Clorox. It safely removes oil spots, grease stains and tar from washable fabrics. It’s effective and easy to use, but it does have a very strong smell.

Simply pour Lestoil onto the greasy stain and let it soak in for about 20 minutes before washing. And if you’re washing a huge greasy load of laundry, add some to the wash water to get the load clean and grease-free.

Lestoil is also good for removing stains from fabric on sofas, chairs, carpets, and concrete driveways.

Last But Not Least

Inspect the treated area before drying to ensure the greasy stains are completely removed. If you can still see any residue, repeat the pre-treating and washing process until clear.

Then, go ahead and dry the garment as usual.

Read More “6 Ways to Cut Down Energy Costs In The Summer”

Battling White Residue Left On Clothes

Residue left on freshly laundered clothes is frustrating and expensive because most of the time you need to rewash the items to get rid of it.

There are several culprits that contribute to this. Through process of elimination, hopefully you’ll be able to solve your residue problem.

Undissolved Detergent

When you are using a top loading machine always pour powdered detergent into the empty washer first before loading clothes. This will give it time to dissolve as the machine fills with water.

If you are washing in cold water the powdered detergent may not dissolve entirely. For best results with cold water and powdered detergent, dissolve it first in a cup of hot water before adding to the washer.

NEVER pour detergent directly on dry clothes or throw the detergent pack (Pod) on top of the load. Doing so will not let the detergent disperses evenly, causing blue or green streaks to appear on lighter clothing.

If you have a front loading washer, or with a top loader with an automatic detergent dispenser, it may be clogged with lumps of detergent. Even liquid products will clump. Remove all detergent dispensers and clean with hot water mixed with 1/2 cup distilled white vinegar.  Make sure it’s not apple cider vinegar.

If the dispensers are not removable. Fill each dispenser with heated pure distilled white vinegar and allow to sit for at least 30 minutes. Then run a wash cycle with no laundry in the drum to clean out the dispensers.

Too Much Detergent

More is not always better. Using too much detergent can leave residue on clothes.

This is particularly true in high-efficiency washers – both top loading and front loading. These washers use much less water during the wash and rinse cycles. Using more than 3 teaspoons (yes, 3 teaspoons) of detergent will leave residue in and on your clothes.

Too much fabric softener

Never pour fabric softener directly on wet clothes and always use the smallest recommended amount. If you have an automatic dispenser, clean it frequently.

Clogged or Failing Water Pump 

If the water in the wash or rinse cycle is draining too slowly, it could be lint, undissolved detergent and/or soil. This can be redeposit on your clothes.

Many new washers have a small door near the bottom of the washer to access the filter right above the water pump. On older washers, you will have to access from the back of the machine in order to clean the pump area.

Open the area to your drain line filter and be sure that it is not clogged with lint or small items that could slow the flow of rinse water.

If you have cleaned the filter and the washer is still slow to drain, the water pump is probably failing.

Overloading Washer

Stuffing too many items into a washer doesn’t leave room for the clothes to move around freely and for the soil and residue to be washed away.

Dirty Washer

If you have never cleaned your washer, it can have soil, minerals and detergent residue that can build-up and redeposit on clothes. It’s like the soap scum in your shower. This is because of the small amount of water in HE, high efficiency, machines. You need to clean HE washers monthly and a standard machine at least twice per year.

 Washing With Hard Water

Hard water can react with detergents and leave mineral deposits that remain on clothes.

Get Rid of the Residue

Once you have eliminated all of the causes of the problem, the only way to get rid of the residue is to rewash the clothes. Wash the stained items again in the hottest water suitable for the fabric but DO NOT add any detergent or fabric softener. Instead, add one cup of distilled white vinegar to the wash cycle to help fibers relax slightly and release the residue.

Read More “6 Ways to Cut Down Energy Costs In The Summer”

Pillow Washing 101

Oversized, bulky and awkward – sometimes it’s hard to know how to wash your pillows.  Just remember with all of the germs, kids, pets, and guests it’s important to remember to wash them. The best way, plain and simple; machine wash your pillows. Most down and synthetic pillows can be machine washed and dried on low heat, but check the label to be sure.

You’ll want to wash and dry at least two pillows at a time to keep your machine balanced, but take care not to stuff too many in at once. Pillows need plenty of water to get thoroughly clean, and plenty of space to get thoroughly dry. Just follow these simple steps and you’ll have clean, fluffy pillows.

NOTE: Foam pillows should not be washed! Sprinkling them with cornstarch, letting them sit for an hour or longer, then vacuuming thoroughly instead.

Detergent / Water Temperature

Make sure you use something that’s fragrance-free and will rinse clean.  Homemade laundry soap is always a good choice: 2 cups soap flakes and 1 cup each baking soda, washing soda, and borax. Water needs to be 140 degrees or higher to kill dust mites, so make sure your water heater isn’t set too low. It’s good to consider an extra spin cycle to squeeze out as much dampness as possible.

Drying

Make sure you dry pillows completely, even a little dampness could reintroduce the very mildew, bacteria, and dust mites you’re trying to avoid. Dry on low, checking them every 20 to 30 minutes to ensure even drying. For extra fluff, dry with dryer balls or a tennis ball in a sock.

Freshening Between Drying

Put your pillows in the dryer on “air fluff” every few months, to get rid of much of the dust.  If you can handle a little bit of the smell until it dissipates, you can include a vinegar-dampened washcloth, since vinegar is so good at killing mold and mildew.

Pillow Protectors

Removable pillow protectors buy you more time between full-on pillow cleaning.  Simply remove and machine-wash protectors in hot water once a month.


Read More “6 Ways to Cut Down Energy Costs In The Summer”
bottom Gears Mobile bottom Gears